一、nginx获取客户端真实IP、域名、协议、端口
需要在Nginx的配置文件nginx.conf中添加如下配置
proxy_set_header Host $http_host;
proxy_set_header X-Real-IP $remote_addr;
proxy_set_header X-Forwarded-For $proxy_add_x_forwarded_for;
proxy_set_header X-Forwarded-Proto $scheme;
各参数的含义如下所示。
Host包含客户端真实的域名和端口号;X-Forwarded-Proto表示客户端真实的协议(http还是https);X-Real-IP表示客户端真实的IP;X-Forwarded-For这个Header和X-Real-IP类似,但它在多层代理时会包含真实客户端及中间每个代理服务器的IP
二、nginx负载均衡配置
http {
       ……
    upstream real_server {
       server 192.168.103.100:2001 weight=1;  #轮询服务器和访问权重
       server 192.168.103.100:2002 weight=2;
    }

    server {
        listen  80;

        location / {
            proxy_pass http://real_server;
        }
    }
}
nginx负载均衡失败重试配置
upstream real_server {
   server 192.168.103.100:2001 weight=1 max_fails=2 fail_timeout=60s;
   server 192.168.103.100:2002 weight=2 max_fails=2 fail_timeout=60s;
}
意思是在fail_timeout时间内失败了max_fails次请求后,则认为该上游服务器不可用,然后将该服务地址踢除掉。fail_timeout时间后会再次将该服务器加入存活列表,进行重试
三、nginx限流配置
1.配置参数
limit_req_zone指令设置参数
limit_req_zone $binary_remote_addr zone=mylimit:10m rate=10r/s;
- limit_req_zone定义在http块中,$binary_remote_addr表示保存客户端IP地址的二进制形式。
- Zone定义IP状态及URL访问频率的共享内存区域。zone=keyword标识区域的名字,以及冒号后面跟区域大小。16000个IP地址的状态信息约1MB,所以示例中区域可以存储160000个IP地址。
- Rate定义最大请求速率。示例中速率不能超过每秒10个请求。
2.设置限流
location / {
        limit_req zone=mylimit burst=20 nodelay;
        proxy_pass http://real_server;
}
burst排队大小,nodelay不限制单个请求间的时间。
3.不限流白名单
geo $limit {
default              1;
192.168.2.0/24  0;
}

map $limit $limit_key {
1 $binary_remote_addr;
0 "";
}

limit_req_zone $limit_key zone=mylimit:10m rate=1r/s;

location / {
        limit_req zone=mylimit burst=1 nodelay;
        proxy_pass http://real_server;
}
上述配置中,192.168.2.0/24网段的IP访问是不限流的,其他限流。
IP后面的数字含义:
- 24表示子网掩码:255.255.255.0
- 16表示子网掩码:255.255.0.0
- 8表示子网掩码:255.0.0.0
四、nginx缓存配置
1.浏览器缓存
静态资源缓存用expire
location ~*  .(jpg|jpeg|png|gif|ico|css|js)$ {
   expires 2d;
}
Response Header中添加了Expires和Cache-Control,
静态资源包括(一般缓存)
- 普通不变的图像,如logo,图标等
- js、css静态文件
- 可下载的内容,媒体文件
协商缓存(add_header ETag/Last-Modified value)
- HTML文件
- 经常替换的图片
- 经常修改的js、css文件
- 基本不变的API接口
不需要缓存
- 用户隐私等敏感数据
- 经常改变的api数据接口
2.代理层缓存
//缓存路径,inactive表示缓存的时间,到期之后将会把缓存清理
proxy_cache_path /data/cache/nginx/ levels=1:2 keys_zone=cache:512m inactive = 1d max_size=8g;

location / {
    location ~ \.(htm|html)?$ {
        proxy_cache cache;
        proxy_cache_key    $uri$is_args$args;     //以此变量值做HASH,作为KEY
        //HTTP响应首部可以看到X-Cache字段,内容可以有HIT,MISS,EXPIRES等等
        add_header X-Cache $upstream_cache_status;
        proxy_cache_valid 200 10m;
        proxy_cache_valid any 1m;
        proxy_pass  http://real_server;
        proxy_redirect     off;
    }
    location ~ .*\.(gif|jpg|jpeg|bmp|png|ico|txt|js|css)$ {
        root /data/webapps/edc;
        expires      3d;
        add_header Static Nginx-Proxy;
    }
}
在本地磁盘创建一个文件目录,根据设置,将请求的资源以K-V形式缓存在此目录当中,KEY需要自己定义(这里用的是url的hash值),同时可以根据需要指定某内容的缓存时长,比如状态码为200缓存10分钟,状态码为301,302的缓存5分钟,其他所有内容缓存1分钟等等。 可以通过purger的功能清理缓存。
AB测试/个性化需求时应禁用掉浏览器缓存
五、nginx黑名单配置
1.一般配置
location / {
    deny  192.168.1.1;
    deny  192.168.1.0/24;
    allow 10.1.1.0/16;
    allow 2001:0db8::/32;
    deny  all;
}
2. Lua+Redis动态黑名单(OpenResty)
安装运行
yum install yum-utils
yum-config-manager --add-repo https://openresty.org/package/centos/openresty.repo
yum install openresty
yum install openresty-resty
查看
yum --disablerepo="*" --enablerepo="openresty" list available
运行
service openresty start
配置(/usr/local/openresty/nginx/conf/nginx.conf)
lua_shared_dict ip_blacklist 1m;

server {
    listen  80;

    location / {
        access_by_lua_file lua/ip_blacklist.lua;
        proxy_pass http://real_server;
    }
}
lua脚本(ip_blacklist.lua)
local redis_host    = "192.168.1.132"
local redis_port    = 6379
local redis_pwd     = 123456
local redis_db = 2

-- connection timeout for redis in ms.
local redis_connection_timeout = 100

-- a set key for blacklist entries
local redis_key     = "ip_blacklist"

-- cache lookups for this many seconds
local cache_ttl     = 60

-- end configuration

local ip                = ngx.var.remote_addr
local ip_blacklist      = ngx.shared.ip_blacklist
local last_update_time  = ip_blacklist:get("last_update_time");

-- update ip_blacklist from Redis every cache_ttl seconds:
if last_update_time == nil or last_update_time < ( ngx.now() - cache_ttl ) then

  local redis = require "resty.redis";
  local red = redis:new();

  red:set_timeout(redis_connect_timeout);

  local ok, err = red:connect(redis_host, redis_port);
  if not ok then
    ngx.log(ngx.ERR, "Redis connection error while connect: " .. err);
  else
    local ok, err = red:auth(redis_pwd)
    if not ok then
      ngx.log(ngx.ERR, "Redis password error while auth: " .. err);
    else
        local new_ip_blacklist, err = red:smembers(redis_key);
        if err then
            ngx.log(ngx.ERR, "Redis read error while retrieving ip_blacklist: " .. err);
        else
        ngx.log(ngx.ERR, "Get data success:" .. new_ip_blacklist)
          -- replace the locally stored ip_blacklist with the updated values:
            ip_blacklist:flush_all();
          for index, banned_ip in ipairs(new_ip_blacklist) do
            ip_blacklist:set(banned_ip, true);
          end
          -- update time
          ip_blacklist:set("last_update_time", ngx.now());
      end
    end
  end
end

if ip_blacklist:get(ip) then
  ngx.log(ngx.ERR, "Banned IP detected and refused access: " .. ip);
  return ngx.exit(ngx.HTTP_FORBIDDEN);
end
六、nginx灰度发布配置
1.根据Cookie实现灰度发布
根据Cookie查询version值,如果该version值为v1转发到host1,为v2转发到host2,都不匹配的情况下转发到默认配置。
upstream host1 {
   server 192.168.2.46:2001 weight=1;  #轮询服务器和访问权重
   server 192.168.2.46:2002 weight=2;
}

upstream host2 {
   server 192.168.1.155:1111  max_fails=1 fail_timeout=60;
}

upstream default {
   server 192.168.1.153:1111  max_fails=1 fail_timeout=60;
}

map $COOKIE_version $group {
   ~*v1$ host1;
   ~*v2$ host2;
   default default;
}

lua_shared_dict ip_blacklist 1m;

server {
    listen  80;

    #set $group "default";
    #if ($http_cookie ~* "version=v1"){
    #    set $group host1;
    #}
    #if ($http_cookie ~* "version=v2"){
    #    set $group host2;
    #}

    location / {
        access_by_lua_file lua/ip_blacklist.lua;
        proxy_pass http://$group;
    }
}
2.根据来路IP实现灰度发布
server {
  ……………
  set $group default;
  if ($remote_addr ~ "192.168.119.1") {
      set $group host1;
  }
  if ($remote_addr ~ "192.168.119.2") {
      set $group host2;
  }
3.更细粒度灰度发布
参考:
https://github.com/sunshinelyz/ABTestingGateway
七、nginx生成缩略图
配置Nginx
使用 Nginx 自带模块生成缩略图,模块:–with-http_image_filter_module,例如,我们可以使用如下参数安装Nginx:
./configure --prefix=/usr/local/nginx-1.19.1 --with-http_stub_status_module --with-http_realip_module --with-http_image_filter_module --with-debug
接下来,修改 nginx.conf 配置文件,或者将下面的配置放到nginx.conf文件相应的 server 块中。
location ~* /(\d+)\.(jpg)$ {
    set $h $arg_h; # 获取参数h的值
    set $w $arg_w; # 获取参数 w 的值
    #image_filter crop $h $w;
    image_filter resize $h $w;# 根据给定的长宽生成缩略图
}
location ~* /(\d+)_(\d+)x(\d+)\.(jpg)$ {
    if ( -e $document_root/$1.$4 ) { # 判断原图是否存在
        rewrite /(\d+)_(\d+)x(\d+)\.(jpg)$ /$1.$4?h=$2&w=$3 last;
    }
    return 404;
}
访问图片
配置完成后,我们就可以使用类似如下的方式来访问图片。
http://www.binghe.com/123_100x10.jpg
当我们在浏览器地址栏中输入上面的链接时,Nginx会作出如下的逻辑处理。
- 首先判断是否存在原图 123.jpg,不存在直接返回 404(如果原图都不存在,那就没必要生成缩略图了)
- 跳转到 http://www.binghe.com/123.jpg?h=100&w=10,将参数高 h=100 和宽 w=10 带到 url 中。
- Image_filter resize 指令根据 h 和 w 参数生成相应缩略图。
注意:使用Nginx生成等比例缩略图时有一个长宽取小的原则,例如原图是 100\*10,你传入的是 10\*2,那么Nginx会给你生成 10\*1 的图片。生成缩略图只是 image_filter 功能中的一个,它一共支持 4 种参数:
- test:返回是否真的是图片
- size:返回图片长短尺寸,返回 json 格式数据
- corp:截取图片的一部分,从左上角开始截取,尺寸写小了,图片会被剪切
- resize:缩放图片,等比例缩放
Nginx 生成缩略图优缺点
优点:
- 根据传入参数即可生成各种比例图片
- 不占用任何硬盘空间
缺点:
- 消耗 CPU
- 访问量大将会给服务器带来比较大的负担
建议:
生成缩略是个消耗 CPU 的操作,如果访问量比较大的站点,最好考虑使用程序生成缩略图到硬盘上,或者在前端加上 Cache缓存或者使用 CDN
八、nginx禁用ip和ip段
Nginx的ngx_http_access_module 模块可以封配置内的ip或者ip段,语法如下:
deny IP;
deny subnet;
allow IP;
allow subnet;
# block all ips
deny    all;
# allow all ips
allow    all;
如果规则之间有冲突,会以最前面匹配的规则为准。
配置禁用ip和ip段
下面说明假定nginx的目录在/usr/local/nginx/。
首先要建一个封ip的配置文件blockips.conf,然后vi blockips.conf编辑此文件,在文件中输入要封的ip。
deny 1.2.3.4;
deny 91.212.45.0/24;
deny 91.212.65.0/24;
然后保存此文件,并且打开nginx.conf文件,在http配置节内添加下面一行配置:
include blockips.conf;
保存nginx.conf文件,然后测试现在的nginx配置文件是否是合法的:
/usr/local/nginx/sbin/nginx -t
如果配置没有问题,就会输出:
the configuration file /usr/local/nginx/conf/nginx.conf syntax is ok
configuration file /usr/local/nginx/conf/nginx.conf test is successful
如果配置有问题就需要检查下哪儿有语法问题,如果没有问题,需要执行下面命令,让nginx重新载入配置文件。
/usr/local/nginx/sbin/nginx -s reload
仅允许内网ip
如何禁止所有外网ip,仅允许内网ip呢?
如下配置文件
location / {
  # block one workstation
  deny    192.168.1.1;
  # allow anyone in 192.168.1.0/24
  allow   192.168.1.0/24;
  # drop rest of the world
  deny    all;
}
上面配置中禁止了192.168.1.1,允许其他内网网段,然后deny all禁止其他所有ip。
格式化nginx的403页面
如何格式化nginx的403页面呢?
首先执行下面的命令:
cd /usr/local/nginx/html
vi error403.html
然后输入403的文件内容,例如:
<html>
<head><title>Error 403 - IP Address Blocked</title></head>
<body>
Your IP Address is blocked. If you this an error, please contact binghe with your IP at test@binghe.com
</body>
</html>
如果启用了SSI,可以在403中显示被封的客户端ip,如下:
Your IP Address is <!--#echo var="REMOTE_ADDR" --> blocked.
保存error403文件,然后打开nginx的配置文件vi nginx.conf,在server配置节内添加下面内容。
# redirect server error pages to the static page
 error_page   403  /error403.html;
 location = /error403.html {
         root   html;
 }
然后保存配置文件,通过nginx -t命令测试配置文件是否正确,若正确通过nginx -s reload载入配置
九、nginx日志分割
首先,我们要创建一个脚本文件,用来分割Nginx日志,具体脚本如下:
vim /usr/local/nginx-1.19.1/cutnginxlog.sh
脚本内容如下:
#!/bin/sh
# Program:
#     Auto cut nginx log script.

# nginx日志路径
LOGS_PATH=/usr/local/nginx-1.19.1/logs
TODAY=$(date -d 'today' +%Y-%m-%d)

# 移动日志并改名
mv ${LOGS_PATH}/error.log ${LOGS_PATH}/error_${TODAY}.log
mv ${LOGS_PATH}/access.log ${LOGS_PATH}/access_${TODAY}.log

# 向nginx主进程发送重新打开日志文件的信号
kill -USR1 $(cat /usr/local/nginx-1.19.1/logs/nginx.pid)
接下来就是给cutnginxlog.sh文件授权。
chmod a+x cutnginxlog.sh
接下来添加计划任务,定时执行cutnginxlog.sh脚本,以root用户执行如下命令:
echo '59 23 * * * root /usr/local/nginx-1.19.1/cutnginxlog.sh >> /usr/local/nginx-1.19.1/cutnginxlog.log 2>&1' >> /etc/crontab
意思就是在每天的23点59分执行脚本。将自动任务的执行日志(错误和正确的日志)自动写入cutnginxlog.log,“命令 » 2>&1” 表示以追加方式将正确输出和错误输出都保存到同一个文件中
十、为已安装的nginx动态添加模块
这里以安装第三方ngx_http_google_filter_module模块为例。
Nginx的模块是需要重新编译Nginx,而不是像Apache一样配置文件引用.so
下载第三方扩展模块ngx_http_google_filter_module
# cd /data/software/
# git clone https://github.com/cuber/ngx_http_google_filter_module
查看nginx编译安装时安装了哪些模块
将命令行切换到Nginx执行程序所在的目录并输入./nginx -V,具体如下:
[root@binghe sbin]# ./nginx -V
nginx version: nginx/1.19.1
built by gcc 4.4.7 20120313 (Red Hat 4.4.7-17) (GCC)
built with OpenSSL 1.0.2 22 Jan 2015
TLS SNI support enabled
configure arguments: --prefix=/usr/local/nginx-1.19.1 --with-openssl=/usr/local/src/openssl-1.0.2 --with-pcre=/usr/local/src/pcre-8.37 --with-zlib=/usr/local/src/zlib-1.2.8 --with-http_ssl_module
[root@binghe sbin]#
可以看出编译安装Nginx使用的参数如下:
--prefix=/usr/local/nginx-1.19.1 --with-openssl=/usr/local/src/openssl-1.0.2 --with-pcre=/usr/local/src/pcre-8.37 --with-zlib=/usr/local/src/zlib-1.2.8 --with-http_ssl_module
加入需要安装的模块,重新编译
这里添加 –add-module=/data/software/ngx_http_google_filter_module
具体如下:
./configure --prefix=/usr/local/nginx-1.19.1 --with-openssl=/usr/local/src/openssl-1.0.2 --with-pcre=/usr/local/src/pcre-8.37 --with-zlib=/usr/local/src/zlib-1.2.8 --with-http_ssl_module -–add-module=/data/software/ngx_http_google_filter_module
如上,将之前安装Nginx的参数全部加上,最后添加 –add-module=/data/software/ngx_http_google_filter_module
之后,我们要进行编译操作,如下:
# make //千万不要make install,不然就真的覆盖
这里,需要注意的是:不要执行make install命令。
替换nginx二进制文件
# 备份原来的nginx执行程序
# mv /usr/local/nginx-1.19.1/sbin/nginx /usr/local/nginx-1.19.1/sbin/nginx.bak

# 将新编译的nginx执行程序复制到/usr/local/nginx-1.19.1/sbin/目录下
# cp /opt/nginx/sbin/nginx /usr/local/nginx-1.19.1/sbin/
十一、nginx格式化日志并推送到远程服务器统一收集维护
格式化Nginx日志并推送到远程服务器,其实很简单,我们只需要在Nginx服务器的配置文件nginx.conf中进行简单的配置即可。例如,我们可以在nginx.conf文件中添加如下配置。
log_format common "$remote_addr,$http_ip,$http_mac,$time_local,$status,$request_length,$bytes_sent,$body_bytes_sent,$http_user_agent,$http_referer,$request_method,$request_time,$request_uri,$server_protocol,$request_body,$http_token";

log_format main "$remote_addr,$http_ip,$http_mac,$time_local,$status,$request_length,$bytes_sent,$body_bytes_sent,$http_user_agent,$http_referer,$request_method,$request_time,$request_uri,$server_protocol,$request_body,$http_token";

access_log  logs/access.log  common;

access_log syslog:server=192.168.1.100:9999,facility=local7,tag=nginx,severity=info main;
  map $http_upgrade $connection_upgrade {
    default upgrade;
    ''      close;
 }
上述配置是将Nginx的日志各项参数以逗号分隔的形式进行输出,同时将Nginx日志实时推送到192.168.1.100:9999上。
此时,我们只需要在192.168.1.100服务器上部署一个TCP或UDP服务,监听端口为9999,并在192.168.1.100服务器的防火墙开放9999端口。我们写的TCP或UDP服务就会实时接收到Nginx服务器发送过来的日志。
通过这种方式,我们就可以将Nginx日志实时收集到某个存储集群中,对Nginx日志进行统一存储、维护和分析
十二、nginx配置WebSocket
Nginx配置WebSocket也比较简单,只需要在nginx.conf文件中进行相应的配置。这种方式很简单,但是很有效,能够横向扩展WebSocket服务端的服务能力。
先直接展示配置文件,如下所示(使用的话直接复制,然后改改ip和port即可)
map $http_upgrade $connection_upgrade {
    default upgrade;
    '' close;
}
upstream wsbackend{
    server ip1:port1;
    server ip2:port2;
    keepalive 1000;
}

server {
    listen 20038;
    location /{
        proxy_http_version 1.1;
        proxy_pass http://wsbackend;
        proxy_redirect off;
        proxy_set_header Host $host;
        proxy_set_header X-Real-IP $remote_addr;
        proxy_read_timeout 3600s;
        proxy_set_header X-Forwarded-For $proxy_add_x_forwarded_for;
        proxy_set_header Upgrade $http_upgrade;
        proxy_set_header Connection $connection_upgrade;
    }
}
接下来,我们就分别分析上述配置的具体含义。
首先:
map $http_upgrade $connection_upgrade {
    default upgrade;
    '' close;
}
表示的是:
如果 $http_upgrade 不为 '' (空),则 $connection_upgrade 为 upgrade 。如果 $http_upgrade 为 '' (空),则 $connection_upgrade 为 close。
其次:
upstream wsbackend{
    server ip1:port1;
    server ip2:port2;
    keepalive 1000;
}
表示的是 nginx负载均衡:
- 两台服务器 (ip1:port1)和(ip2:port2) 。
- keepalive 1000 表示的是每个nginx进程中上游服务器保持的空闲连接,当空闲连接过多时,会关闭最少使用的空闲连接.当然,这不是限制连接总数的,可以想象成空闲连接池的大小,设置的值应该是上游服务器能够承受的。
最后:
server {
    listen 20038;
    location /{
        proxy_http_version 1.1;
        proxy_pass http://wsbackend;
        proxy_redirect off;
        proxy_set_header Host $host;
        proxy_set_header X-Real-IP $remote_addr;
        proxy_read_timeout 3600s;
        proxy_set_header X-Forwarded-For $proxy_add_x_forwarded_for;
        proxy_set_header Upgrade $http_upgrade;
        proxy_set_header Connection $connection_upgrade;
    }
}
表示的是监听的服务器的配置
listen 20038 表示 nginx 监听的端口locations / 表示监听的路径(/表示所有路径,通用匹配,相当于default)proxt_http_version 1.1 表示反向代理发送的HTTP协议的版本是1.1,HTTP1.1支持长连接proxy_pass http://wsbackend; 表示反向代理的uri,这里可以使用负载均衡变量proxy_redirect off; 表示不要替换路径,其实这里如果是/则有没有都没关系,因为default也是将路径替换到proxy_pass的后边proxy_set_header Host $host; 表示传递时请求头不变, $host是nginx内置变量,表示的是当前的请求头,proxy_set_header表示设置请求头proxy_set_header X-Real-IP $remote_addr; 表示传递时来源的ip还是现在的客户端的ipproxy_read_timeout 3600s;表的两次请求之间的间隔超过 3600s 后才关闭这个连接,默认的60s,自动关闭的元凶proxy_set_header X-Forwarded-For $proxy_add_x_forwarded_for; 表示X-Forwarded-For头不发生改变proxy_set_header Upgrade $http_upgrade; 表示设置Upgrade不变proxy_set_header Connection $connection_upgrade; 表示如果 $http_upgrade为upgrade,则请求为upgrade(websocket),如果不是,就关闭连接
十三、nginx实现MySQL负载均衡
user  nginx;
#user root;
worker_processes  1;
error_log  /var/log/nginx/error.log warn;
pid        /var/run/nginx.pid;
events {
    worker_connections  1024;
}
http {
    include       /etc/nginx/mime.types;
    default_type  application/octet-stream;
    log_format  main  '$remote_addr - $remote_user [$time_local] "$request" '
                      '$status $body_bytes_sent "$http_referer" '
                      '"$http_user_agent" "$http_x_forwarded_for"';
    access_log  /var/log/nginx/access.log  main;
    sendfile        on;
    #tcp_nopush     on;
    keepalive_timeout  65;
    #gzip  on;
    include /etc/nginx/conf.d/*.conf;
}

stream{
    upstream mysql{
        server 192.168.1.101:3306 weight=1;
        server 192.168.1.102:3306 weight=1;
    }

    server{
        listen 3306;
        server_name 192.168.1.100;
        proxy_pass mysql;
    }
}
配置完成后,我们就可以通过如下方式来访问MySQL数据库。
jdbc:mysql://192.168.1.100:3306/数据库名称
此时,Nginx会将访问MySQL的请求路由到IP地址为192.168.1.101和192.168.1.102的MySQL上
十四、nginx解决跨域问题
server {
        location / {
            root   html;
            index  index.html index.htm;
            //允许cros跨域访问
            add_header 'Access-Control-Allow-Origin' '*';

        }
        //自定义本地路径
        location /apis {
            rewrite  ^.+apis/?(.*)$ /$1 break;
            include  uwsgi_params;
            proxy_pass   http://www.binghe.com;
       }
}
十五、nginx图片显示过慢,文件下载不完全问题处理
问题定位
经过一系列的排查(中间过程我就省略了,直接写重点了!),最终定位到是Nginx的问题。当我打开这位读者的网站后台管理系统,发现图片显示非常慢,在Nginx前端代理上查出如下错误信息。
[error] 28423#0: *5 connect() failed (111: Connection refused) while connecting to upstream
直接在后台服务器上用后台服务器的IP地址去访问,发现速度相当快,于是怀疑是Nginx的配置问题。
注意:当下载大的附件,或是页面中有大图片时,就会下载中断或是图片无法显示,也许你会说我用的Nginx缺省的配置也从来没有碰到过这种问题呀!我想说的是:那是因为你的网站没有大文件,至少没有大到使用Nginx的默认配置加载不出来。
这里,我给出一段Nginx的配置,如下所示。
location /file {
     root /home/file;
     index  index.html index.htm;
     proxy_set_header X-Real-IP $remote_addr;
     proxy_set_header   Host $host;
     proxy_pass http://127.0.0.1:8080 ;
     client_max_body_size     100m;
     client_body_buffer_size  128k;
     proxy_connect_timeout    600;
     proxy_read_timeout       600;
     proxy_send_timeout       600;
     proxy_buffer_size        32k;
     proxy_buffers          4 64k;
     proxy_busy_buffers_size 64k;
     proxy_temp_file_write_size 64k;
}
其中几个重要的参数如下所示。
- proxy_connect_timeout 600; #nginx跟后端服务器连接超时时间(代理连接超时)
- proxy_read_timeout 600; #连接成功后,后端服务器响应时间(代理接收超时)
- proxy_send_timeout 600; #后端服务器数据回传时间(代理发送超时)
- proxy_buffer_size 32k; #设置代理服务器(nginx)保存用户头信息的缓冲区大小
- proxy_buffers 4 32k; #proxy_buffers缓冲区,网页平均在32k以下的话,这样设置
- proxy_busy_buffers_size 64k; #高负荷下缓冲大小(proxy_buffers*2)
- proxy_temp_file_write_size 16k; #设定缓存文件夹大小,大于这个值,将从upstream服务器传
看到这里,发现问题了,这位读者的Nginx有下面一行配置。
proxy_temp_file_write_size 16k;
而他服务器上的图片基本都在100K~5M之间。
问题就出在proxy_temp_file_write_size上,当服务器上的文件超过该参数设置的大小时,Nginx会先将文件写入临时目录(缺省为Nginx安装目下/proxy_temp目录),缺省Nginx是以nobody身份启动的,用ls -al 命令查看proxy_temp目录 nobody是proxy_temp目录的所有者,怪了那为什么没权限呢?接下来查看proxy_temp的父目录既Nginx安装目录。发现nobody竞然没权限,怪不得会出现上面的问题。
解决问题
定位到问题,接下来解决问题就比较简单了。可以使用两种方式解决这个问题,如下所示。
- 设置任何人都可以写 proxy_temp目录,重启 Nginx 即可解决。
- 直接更改proxy_temp_file_write_size的值,将其修改为大于图片和文件的大小,重启Nginx。
如果是以第一种方式解决问题的话,比如我的proxy_temp目录是/usr/local/nginx/proxy_temp,用如下命令将/usr/local/nginx/proxy_temp目录设置为任何人都可以写,问题解决。
chmod -R 777 /usr/local/nginx/proxy_temp/
如果是使用第二种方式解决问题的话,就可以直接修改nginx.conf文件,如下所示。
location /file {
     root /home/file;
     index  index.html index.htm;
     proxy_set_header X-Real-IP $remote_addr;
     proxy_set_header   Host $host;
     proxy_pass http://127.0.0.1:8080 ;
     client_max_body_size     100m;
     client_body_buffer_size  256k;
     proxy_connect_timeout    1200;
     proxy_read_timeout       1200;
     proxy_send_timeout       6000;
     proxy_buffer_size        32k;
     proxy_buffers            4 64k;
     proxy_busy_buffers_size  128k;
     proxy_temp_file_write_size 10m;
}
十六、使用Nginx搭建流媒体服务器实现直播
安装Nginx
注意:这里以CentOS 6.8服务器为例,以root用户身份来安装Nginx。
1.安装依赖环境
yum -y install wget gcc-c++ ncurses ncurses-devel cmake make perl bison openssl openssl-devel gcc* libxml2 libxml2-devel curl-devel libjpeg* libpng* freetype* autoconf automake zlib* fiex* libxml* libmcrypt* libtool-ltdl-devel* libaio libaio-devel bzr libtool
2.安装openssl
wget https://www.openssl.org/source/openssl-1.0.2s.tar.gz
tar -zxvf openssl-1.0.2s.tar.gz
cd /usr/local/src/openssl-1.0.2s
./config --prefix=/usr/local/openssl-1.0.2s
make
make install
3.安装pcre
wget https://ftp.pcre.org/pub/pcre/pcre-8.43.tar.gz
tar -zxvf pcre-8.43.tar.gz
cd /usr/local/src/pcre-8.43
./configure --prefix=/usr/local/pcre-8.43
make
make install
4.安装zlib
wget https://sourceforge.net/projects/libpng/files/zlib/1.2.11/zlib-1.2.11.tar.gz
tar -zxvf zlib-1.2.11.tar.gz
cd /usr/local/src/zlib-1.2.11
./configure --prefix=/usr/local/zlib-1.2.11
make
make
5.下载nginx-rtmp-module
nginx-rtmp-module的官方github地址:https://github.com/arut/nginx-rtmp-module
使用命令:
git clone https://github.com/arut/nginx-rtmp-module.git
6.安装Nginx
wget http://nginx.org/download/nginx-1.19.1.tar.gz
tar -zxvf nginx-1.19.1.tar.gz
cd /usr/local/src/nginx-1.19.1
./configure --prefix=/usr/local/nginx-1.19.1 --with-openssl=/usr/local/src/openssl-1.0.2s --with-pcre=/usr/local/src/pcre-8.43 --with-zlib=/usr/local/src/zlib-1.2.11 --add-module=/usr/local/src/nginx-rtmp-module --with-http_ssl_module
make
make install
这里需要注意的是:安装Nginx时,指定的是openssl、pcre和zlib的源码解压目录,安装完成后Nginx配置文件的完整路径为:/usr/local/nginx-1.19.1/conf/nginx.conf。
配置Nginx
配置Nginx主要是对Nginx的nginx.conf文件进行配置,我们可以在命令行输入如下命令编辑nginx.conf文件。
vim /usr/local/nginx-1.19.1/conf/nginx.conf
在文件中添加如下内容。
rtmp {
    server {
        listen 1935;  #监听的端口
        chunk_size 4096;
        application hls {  #rtmp推流请求路径
            live on;
            hls on;
            hls_path /usr/share/nginx/html/hls;
            hls_fragment 5s;
        }
    }
}
其中,hls_path需要可读可写的权限。接下来,我们创建/usr/share/nginx/html/hls 目录。
mkdir -p /usr/share/nginx/html/hls
chmod -R 777 /usr/share/nginx/html/hls
接下来,修改http中的server模块:
server {
    listen       81;
    server_name  localhost;

    #charset koi8-r;

    #access_log  logs/host.access.log  main;

    location / {
        root   /usr/share/nginx/html;
        index  index.html index.htm;
    }

    #error_page  404              /404.html;

    # redirect server error pages to the static page /50x.html
    #
    error_page   500 502 503 504  /50x.html;
    location = /50x.html {
        root   html;
    }
}
然后启动Nginx:
/usr/local/nginx-1.19.1/sbin/nginx -c /usr/local/nginx-1.19.1/conf/nginx.conf
使用OBS推流
OBS(Open Broadcaster Software) 是以互联网流媒体直播内容为目的免费和开放源码软件。需要下载这个软件,借助这个软件进行推流(电脑没有摄像头的貌似安装不了。。。)
OBS的下载链接为:https://obsproject.com/zh-cn/download。
安装后,桌面上会有一个如下所示的图标。

打开后我们需要有一个场景,并且在这个场景下有一个流的来源(可以是窗口,如果选的是视频则会自动识别摄像头),接下来就是设置了。

在配置中最需要关注的就是流的配置,由于是自建的流媒体服务器所以我们按照如下所示的方式进行配置。
rtmp://你的服务器ip:端口(1935)/live #URL填写流的地址
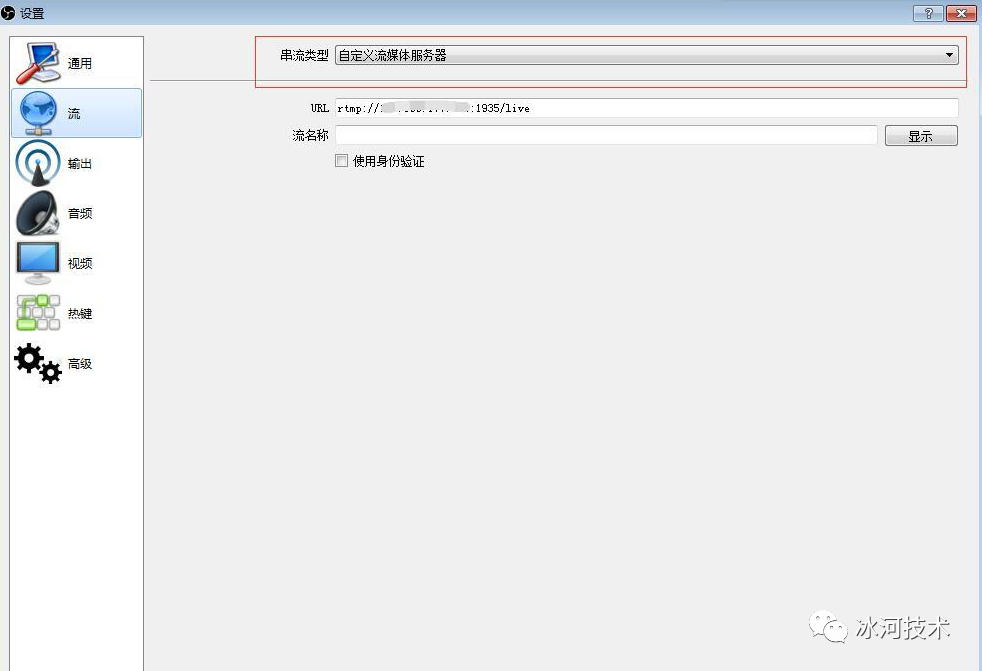
设置完成我们就可以 开始推流了。
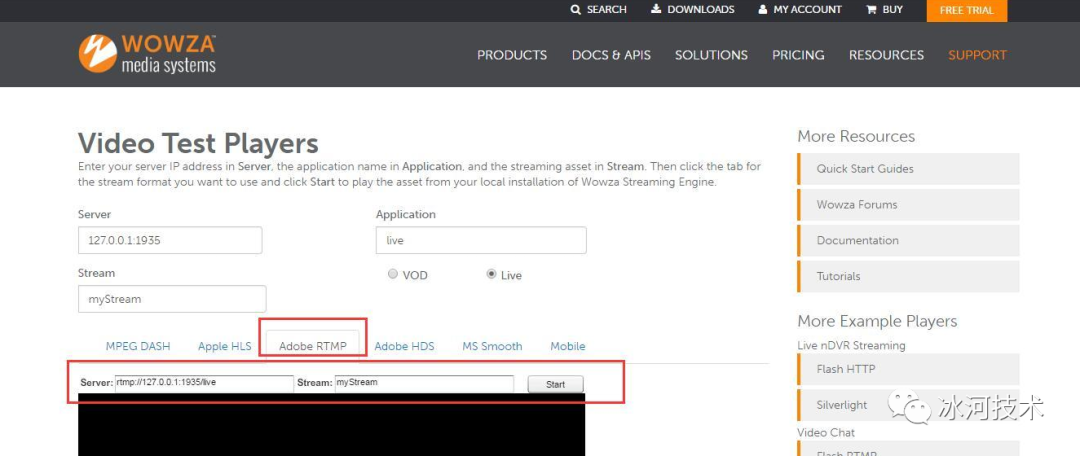
拉流测试地址
推荐一个拉流的测试地址,里面针对各种协议都能测试拉流测试,需要注意图中几个地方,由于我们使用的rtmp协议,我们选择这一栏,底下填写我们推流的地址和我们在上面obs的设置里面配置的流的名称,start, ok搞定!!!
十七、nginx的转发规则
Nginx的location语法
location [=|~|~*|^~] /uri/ { … }
- = 严格匹配。如果请求匹配这个location,那么将停止搜索并立即处理此请求
- ~ 区分大小写匹配(可用正则表达式)
- ~* 不区分大小写匹配(可用正则表达式)
- !~ 区分大小写不匹配
- !~* 不区分大小写不匹配
- ^~ 如果把这个前缀用于一个常规字符串,那么告诉nginx 如果路径匹配那么不测试正则表达式
示例1:
location / { }
匹配任意请求
示例2:
location ~* .(gif|jpg|jpeg)$ {
    rewrite .(gif|jpg|jpeg)$ /logo.png;
}
不区分大小写匹配任何以gif、jpg、jpeg结尾的请求,并将该请求重定向到 /logo.png请求
示例3:
location ~ ^.+\.txt$ {
    root /usr/local/nginx/html/;
}
区分大小写匹配以.txt结尾的请求,并设置此location的路径是/usr/local/nginx/html/。也就是以.txt结尾的请求将访问/usr/local/nginx/html/ 路径下的txt文件
alias与root的区别
- root 实际访问文件路径会拼接URL中的路径
- alias 实际访问文件路径不会拼接URL中的路径
示例如下:
location ^~ /binghe/ {
   alias /usr/local/nginx/html/binghetic/;
}
- 请求:http://test.com/binghe/binghe1.html
- 实际访问:/usr/local/nginx/html/binghetic/binghe1.html 文件
location ^~ /binghe/ {
   root /usr/local/nginx/html/;
}
- 请求:http://test.com/binghe/binghe1.html
- 实际访问:/usr/local/nginx/html/binghe/binghe1.html 文件
last 和 break关键字的区别
(1)last 和 break 当出现在location 之外时,两者的作用是一致的没有任何差异
(2)last 和 break 当出现在location 内部时:
- last 使用了last 指令,rewrite 后会跳出location 作用域,重新开始再走一次刚才的行为
- break 使用了break 指令,rewrite后不会跳出location 作用域,其整个生命周期都在当前location中。
permanent 和 redirect关键字的区别
- rewrite … permanent 永久性重定向,请求日志中的状态码为301
- rewrite … redirect 临时重定向,请求日志中的状态码为302
综合实例
将符合某个正则表达式的URL重定向到一个固定页面
比如:我们需要将符合“/test/(\d+)/[\w-.]+” 这个正则表达式的URL重定向到一个固定的页面。符合这个正则表达式的页面可能是:http://test.com/test/12345/abc122.html、http://test.com/test/456/11111cccc.js等
从上面的介绍可以看出,这里可以使用rewrite重定向或者alias关键字来达到我们的目的。因此,这里可以这样做:
(1)使用rewrite关键字
location ~ ^.+\.txt$ {
    root /usr/local/nginx/html/;
}
location ~* ^/test/(\d+)/[\w-\.]+$ {
    rewrite ^/test/(\d+)/[\w-\.]+$ /testpage.txt last;
}
这里将所有符合条件的URL(PS:不区分大小写)都重定向到/testpage.txt请求,也就是 /usr/local/nginx/html/testpage.txt 文件
(2)使用alias关键字
location ~* ^/test/(\d+)/[\w-\.]+$ {
    alias /usr/local/nginx/html/binghetic/binghe1.html;
}
这里将所有符合条件的URL(不区分大小写)都重定向到/usr/local/nginx/html/binghetic/binghe1.html 文件
十八、nginx.conf常用配置
user  nginx;
worker_processes  auto;
worker_rlimit_nofile  65535;


pid        /var/run/nginx.pid;
events {
    worker_connections  65535;
    multi_accept on;
    use epoll;
}
http {
    include       /etc/nginx/mime.types;
    default_type  application/octet-stream;
    log_format  main  '[$time_local] RemoteAddr:"$remote_addr" RemoteUser:"$remote_user" Host:"$host" '
                      'RequestUil:"$request" HttpStatus:"$status" BodyBytesSent:"$body_bytes_sent" '
                      'HttpReferer:"$http_referer" HttpUserAgent:"$http_user_agent" '
                      'Http_X_ForwardedFor:"$http_x_forwarded_for" UpstreamResponseTime:"$upstream_response_time" '
                      'UpstreamAddr:"$upstream_addr" RequestTime:"$request_time" --- $server_port';
    log_format  json  '{'
        '"RemoteAddr":"$remote_addr",'
        '"RemoteUser":"$remote_user",'
        '"TimeLocal":"$time_local",'
        '"RequestUil":"$request",'
        '"HttpHost":"$http_host"'
        '"HttpStatus":"$status",'
        '"BodyBytesSent":"$body_bytes_sent",'
        '"HttpReferer":"$http_referer",'
        '"HttpUserAgent":"$http_user_agent",'
        '"Http_X_ForwardedFor":"$http_x_forwarded_for",'
        '"SslProtocol":"$ssl_protocol"'
        '"SslCipher":"$ssl_cipher"'
        '"UpstreamResponseTime":"$upstream_response_time",'
        '"UpstreamAddr":"$upstream_addr",'
        '"RequestTime":"$request_time",'
    '}';

    access_log /data/logs/nginx_logs/access.log  main;
    error_log  /data/logs/nginx_logs/error.log error;


    access_log                      off;
    server_tokens                   off;
    sendfile                         on;
    tcp_nopush                       on;
    tcp_nodelay                      on;
    send_timeout                    300;
    keepalive_timeout               300;
    resolver_timeout                 60;
    server_names_hash_max_size      512;
    server_names_hash_bucket_size   128;

    client_body_timeout             300;
    client_header_timeout           300;
    client_header_buffer_size      512k;
    client_max_body_size           300m;
    large_client_header_buffers  8  32k;
    client_body_buffer_size        256k;

    fastcgi_connect_timeout         300;
    fastcgi_send_timeout            300;
    fastcgi_read_timeout            300;
    fastcgi_buffer_size            128k;
    fastcgi_buffers          8     256k;
    fastcgi_busy_buffers_size      256k;
    fastcgi_temp_file_write_size   256k;
    fastcgi_temp_path /tmp/ngx_fcgi_tmp;
    fastcgi_cache_path /tmp/fcgi_cache_path levels=1:2 keys_zone=ngx_fcgi_cache:512m inactive=1d max_size=10g;

    gzip  on;
    gzip_http_version   1.1;
    gzip_min_length      1k;
    gzip_buffers 4      16k;
    gzip_comp_level       9;
    gzip_types text/plain application/json application/x-javascript text/css application/xml text/javascript application/x-httpd-php image/jpeg image/gif image/png;
    gzip_vary            on;
    gzip_disable "MSIE [1-6]\.";

    proxy_http_version           1.1;
    proxy_set_header Connection   "";
    proxy_set_header     Host  $host;
    proxy_connect_timeout        300;
    proxy_read_timeout           300;
    proxy_send_timeout           300;
    proxy_buffering               on;
    proxy_buffer_size           128k;
    proxy_buffers            8  128k;
    proxy_busy_buffers_size     256k;
    proxy_temp_file_write_size  256k;
    proxy_temp_path  /tmp/proxy_temp_path;
    proxy_cache_path /tmp/proxy_cache_path levels=1:2 keys_zone=ngx_proxy_cache:512m inactive=1d max_size=10g;
    include /etc/nginx/conf.d/*.conf;
}
include /etc/nginx/stream.d/*.conf;
十九、stream常用配置
stream {
        upstream redis {
                server  192.168.1.1:6379;
        }
        server {
                listen 6372;
                proxy_pass redis;
                proxy_connect_timeout 1h;
                proxy_timeout 1h;
        }
}
二十、server常用配置
server {
    listen   80;
    listen   81;
    server_name 127.0.0.1  test.example.com;
    index  index.php index.html index.htm;
    root /data/web/test/www;
    charset utf-8;
    access_log  /data/logs/nginx_logs/test.example.com.log  main;
    location / {
        if (!-e $request_filename) {
             rewrite ^/(.*) /index.php?$1 last;
        }
    }

    location /business/ {
             if ($arg_icpid = "4pd1mtsDhfe" ) {
                    proxy_pass http://127.0.0.1:38888/test$request_uri&tbid=aldIthSBg04;
             }
             proxy_pass http://127.0.0.1:9302;
    }


    location /gateway/ {
        proxy_pass http://127.0.0.1:38888/;
    }
    location ~ \.php$ {
        fastcgi_param  REMOTE_ADDR $http_x_real_ip;
        fastcgi_param LY_ADDRESS $remote_addr;
        fastcgi_pass   unix:/dev/shm/php-cgi.sock;
        fastcgi_index  index.php;
        fastcgi_param  SCRIPT_FILENAME  $document_root$fastcgi_script_name;
        fastcgi_param  SERVERNAME     $hostname;
        include        fastcgi_params;
   }
   location = /favicon.ico {
        log_not_found off;
        access_log off;
   }
   location = /robots.txt {
        allow all;
        log_not_found off;
        access_log off;
   }
}

server {
    listen   80;
    listen   443 ssl;
    server_name  test.example.com;
    charset utf-8;
    access_log  /data/logs/nginx_logs/test.example.com.log main;

    ssl_certificate   /etc/nginx/cert/example.com.pem;
    ssl_certificate_key  /etc/nginx/cert/example.com.key;
    ssl_session_timeout 5m;
    ssl_ciphers ECDHE-RSA-AES128-GCM-SHA256:ECDHE:ECDH:AES:HIGH:!NULL:!aNULL:!MD5:!ADH:!RC4;
    ssl_protocols TLSv1 TLSv1.1 TLSv1.2;
    ssl_prefer_server_ciphers on;

    location / {
        proxy_pass http://127.0.0.1:38888;
    }
    location = /favicon.ico {
            log_not_found off;
            access_log off;
    }
    location = /robots.txt {
            allow all;
            log_not_found off;
            access_log off;
    }
}