Spring Cloud微服务项目交付
微服务扫盲篇
微服务并没有一个官方的定义,想要直接描述微服务比较困难,我们可以通过对比传统WEB应用,来理解什么是微服务。
单体应用架构
如下是传统打车软件架构图:
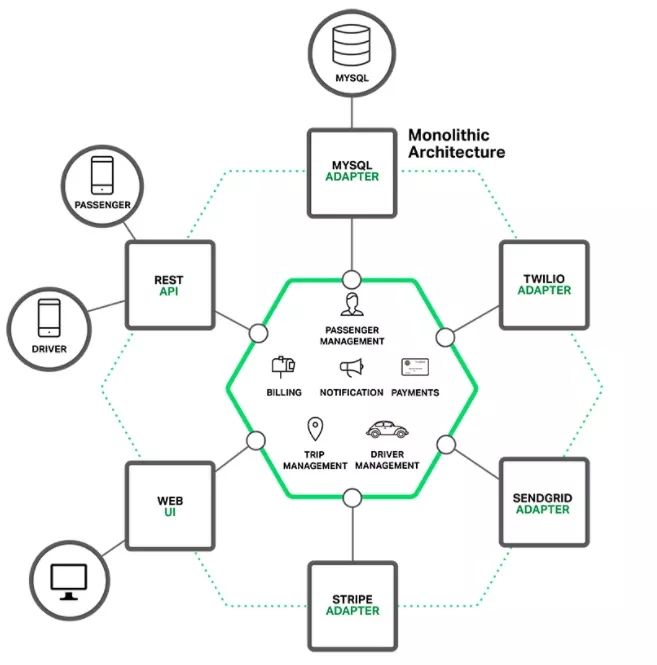
这种单体应用比较适合于小项目,优点是:
- 开发简单直接,集中式管理
- 基本不会重复开发
- 功能都在本地,没有分布式的管理开销和调用开销
当然它的缺点也十分明显,特别对于互联网公司来说:
- 开发效率低:所有的开发在一个项目改代码,递交代码相互等待,代码冲突不断
- 代码维护难:代码功能耦合在一起,新人不知道何从下手
- 部署不灵活:构建时间长,任何小修改必须重新构建整个项目,这个过程往往很长
- 稳定性不高:一个微不足道的小问题,可以导致整个应用挂掉
- 扩展性不够:无法满足高并发情况下的业务需求
微服务应用架构
微服务架构的设计思路不是开发一个巨大的单体式应用,而是将应用分解为小的、互相连接的微服务。一个微服务完成某个特定功能,比如乘客管理和下单管理等。每个微服务都有自己的业务逻辑和适配器。一些微服务还会提供API接口给其他微服务和应用客户端使用。
比如,前面描述的系统可被分解为:
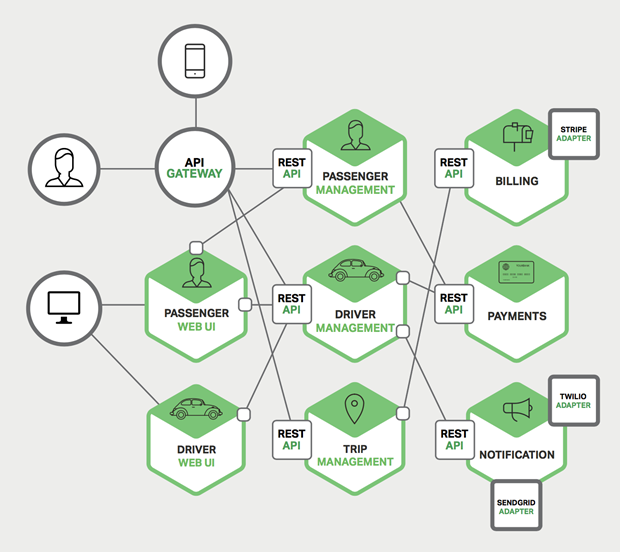
每个业务逻辑都被分解为一个微服务,微服务之间通过REST API通信。一些微服务也会向终端用户或客户端开发API接口。但通常情况下,这些客户端并不能直接访问后台微服务,而是通过API Gateway来传递请求。API Gateway一般负责服务路由、负载均衡、缓存、访问控制和鉴权等任务。
微服务架构优点:
- 解决了复杂性问题。它将单体应用分解为一组服务。虽然功能总量不变,但应用程序已被分解为可管理的模块或服务
- 体系结构使得每个服务都可以由专注于此服务的团队独立开发。只要符合服务API契约,开发人员可以自由选择开发技术。这就意味着开发人员可以采用新技术编写或重构服务,由于服务相对较小,所以这并不会对整体应用造成太大影响
- 微服务架构可以使每个微服务独立部署。这些更改可以在测试通过后立即部署。所以微服务架构也使得CI/CD成为可能
微服务架构问题及挑战
微服务的一个主要缺点是微服务的分布式特点带来的复杂性。开发人员需要基于RPC或者消息实现微服务之间的调用和通信,而这就使得服务之间的发现、服务调用链的跟踪和质量问题变得的相当棘手。
- 微服务的一大挑战是跨多个服务的更改
- 比如在传统单体应用中,若有A、B、C三个服务需要更改,A依赖B,B依赖C。我们只需更改相应的模块,然后一次性部署即可。
- 在微服务架构中,我们需要仔细规划和协调每个服务的变更部署。我们需要先更新C,然后更新B,最后更新A。
- 部署基于微服务的应用也要复杂得多
- 单体应用可以简单的部署在一组相同的服务器上,然后前端使用负载均衡即可。
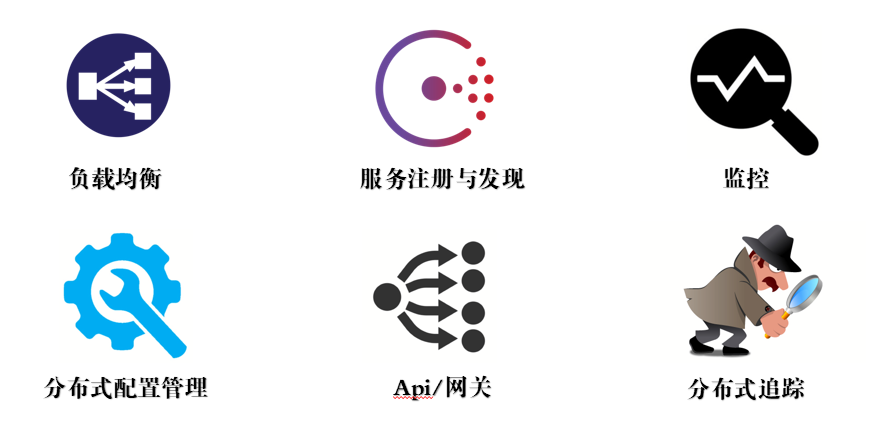
- 微服务由不同的大量服务构成。每种服务可能拥有自己的配置、应用实例数量以及基础服务地址。这里就需要不同的配置、部署、扩展和监控组件。此外,我们还需要服务发现机制,以便服务可以发现与其通信的其他服务的地址
以上问题和挑战可大体概括为:
- API Gateway
- 服务间调用
- 服务发现
- 服务容错
- 服务部署
- 数据调用
https://www.kancloud.cn/owenwangwen/open-capacity-platform/1480155,自助餐吃吃喝喝,竟然秒懂微服务
微服务框架
如何应对上述挑战,出现了如下微服务领域的框架:
-
Spring Cloud(各个微服务基于Spring Boot实现)
-
Dubbo
-
Service Mesh
-
Linkerd
-
Envoy
-
Conduit
-
Istio
-
了解Spring Cloud
核心项目及组件
与Dubbo对比
做一个简单的功能对比:
| 核心要素 | Dubbo | Spring Cloud |
|---|---|---|
| 服务注册中心 | Zookeeper | Spring Cloud Netflix Eureka |
| 服务调用方式 | RPC | REST API |
| 服务监控 | Dubbo-monitor | Spring Boot Admin |
| 断路器 | 不完善 | Spring Cloud Netflix Hystrix |
| 服务网关 | 无 | Spring Cloud Netflix Zuul |
| 分布式配置 | 无 | Spring Cloud Config |
| 服务跟踪 | 无 | Spring Cloud Sleuth |
| 消息总线 | 无 | Spring Cloud Bus |
| 数据流 | 无 | Spring Cloud Stream |
| 批量任务 | 无 | Spring Cloud Task |
| …… | …… | …… |
从上图可以看出其实Dubbo的功能只是Spring Cloud体系的一部分。
这样对比是不够公平的,首先Dubbo是SOA时代的产物,它的关注点主要在于服务的调用,流量分发、流量监控和熔断。而Spring Cloud诞生于微服务架构时代,考虑的是微服务治理的方方面面,另外由于依托了Spirng、Spirng Boot的优势之上,两个框架在开始目标就不一致,Dubbo定位服务治理、Spirng Cloud是一个生态。
Spring Boot交付实践
从零开始创建Spring Boot项目
通过File > New > Project,新建工程,选择Spring Initializr
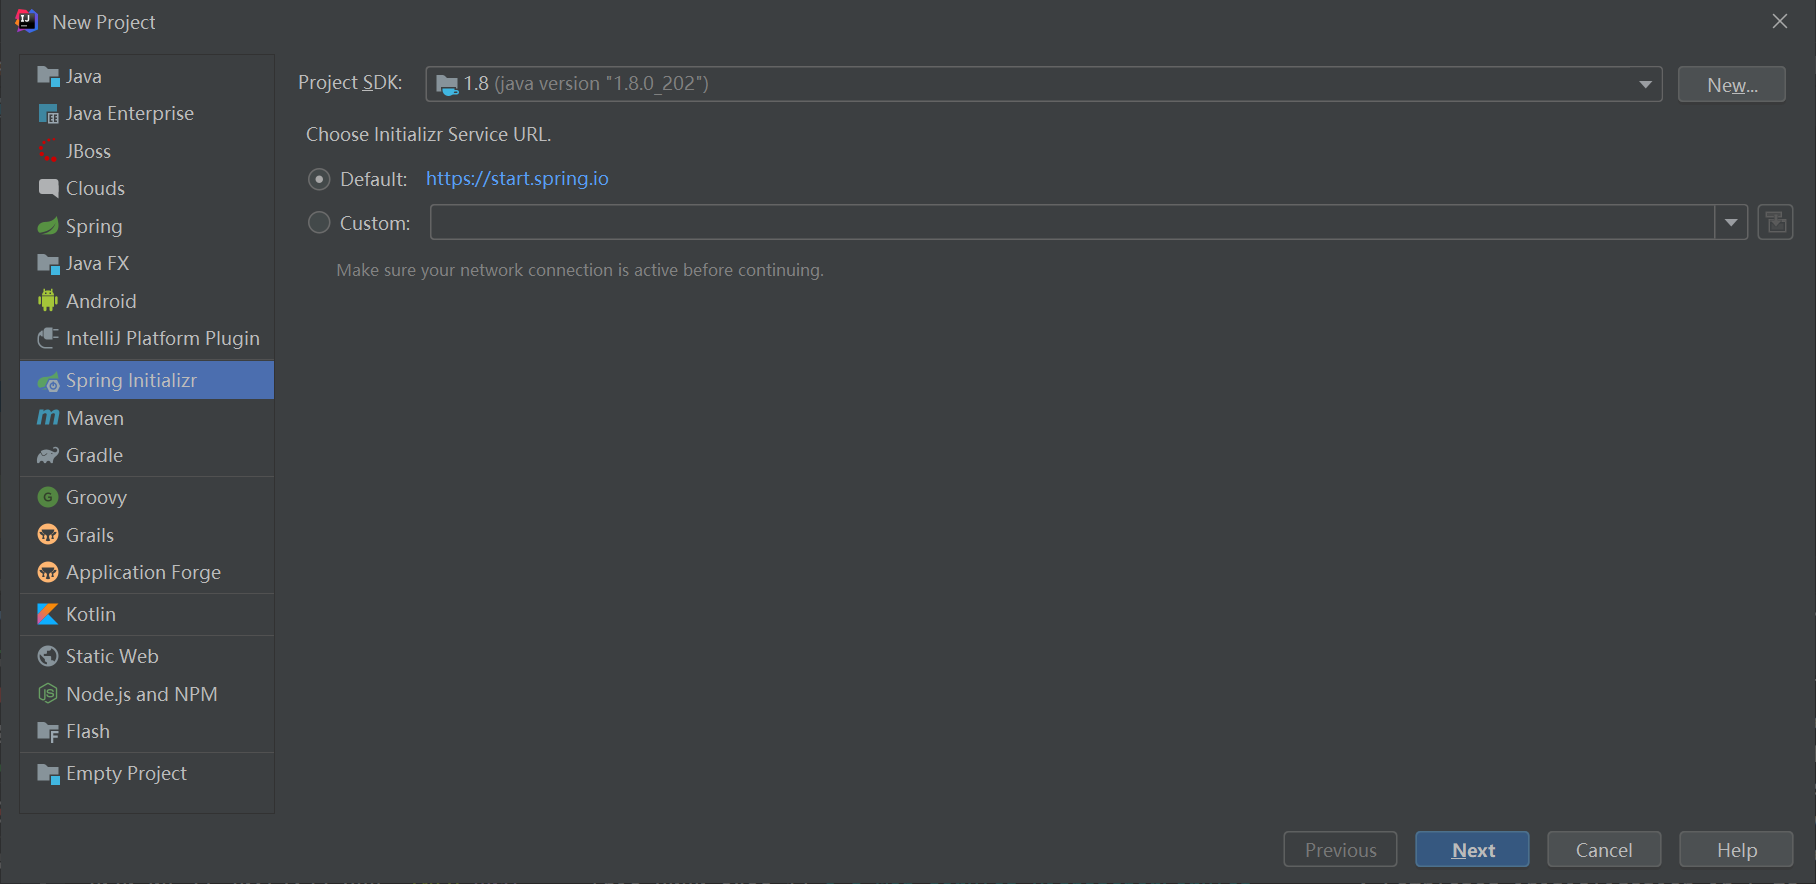
配置Project Metadata:

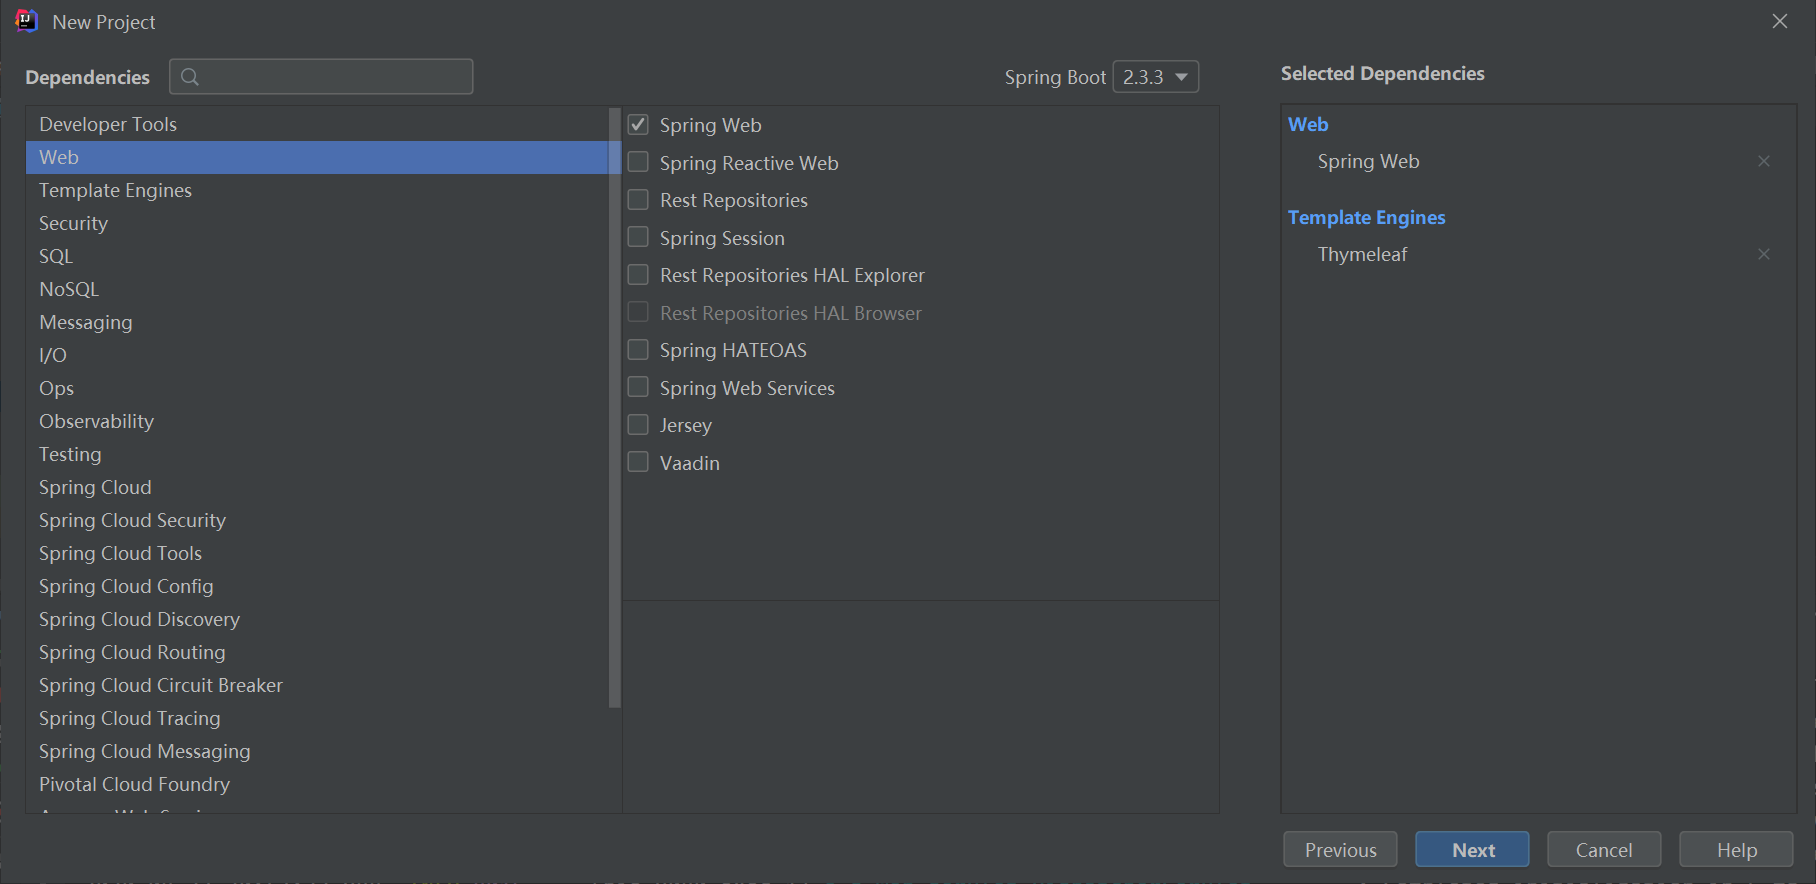
配置Dependencies依赖包:
选择:Web分类中的Spring web和Template Engines中的Thymeleaf
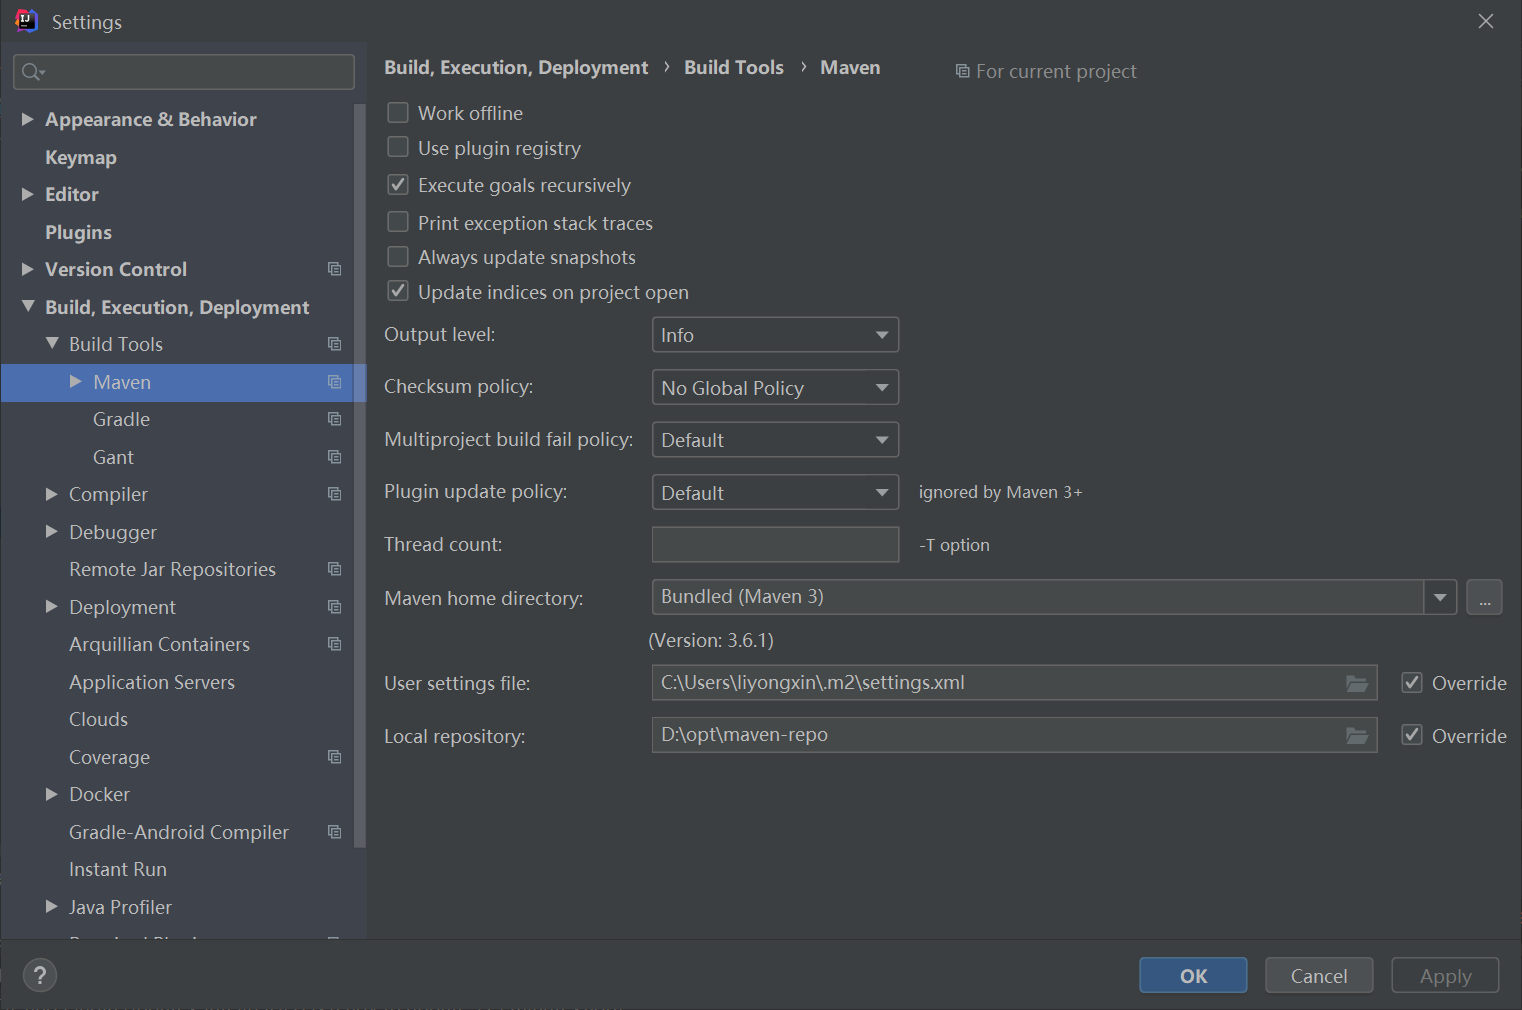
配置maven settings.xml:
默认使用IDE自带的maven,换成自己下载的,下载地址:
链接: https://pan.baidu.com/s/1z9dRGv_4bS1uxBtk5jsZ2Q 提取码: 3gva
解压后放到D:\software\apache-maven-3.6.3,修改D:\software\apache-maven-3.6.3\conf\settings.xml 文件:
<?xml version="1.0" encoding="UTF-8"?>
<settings xmlns="http://maven.apache.org/SETTINGS/1.0.0"
          xmlns:xsi="http://www.w3.org/2001/XMLSchema-instance"
          xsi:schemaLocation="http://maven.apache.org/SETTINGS/1.0.0 http://maven.apache.org/xsd/settings-1.0.0.xsd">
  <localRepository>D:\opt\maven-repo</localRepository>

  <pluginGroups>
  </pluginGroups>

  <proxies>
  </proxies>

  <servers>
  </servers>

  <mirrors>
	    <mirror>
            <id>alimaven</id>
            <mirrorOf>central</mirrorOf>
            <name>aliyun maven</name>
            <url>http://maven.aliyun.com/nexus/content/repositories/central/</url>
        </mirror>
        <mirror>
            <id>nexus-aliyun</id>
            <mirrorOf>*</mirrorOf>
            <name>Nexus aliyun</name>
            <url>http://maven.aliyun.com/nexus/content/groups/public</url>
        </mirror>
  </mirrors>

</settings>
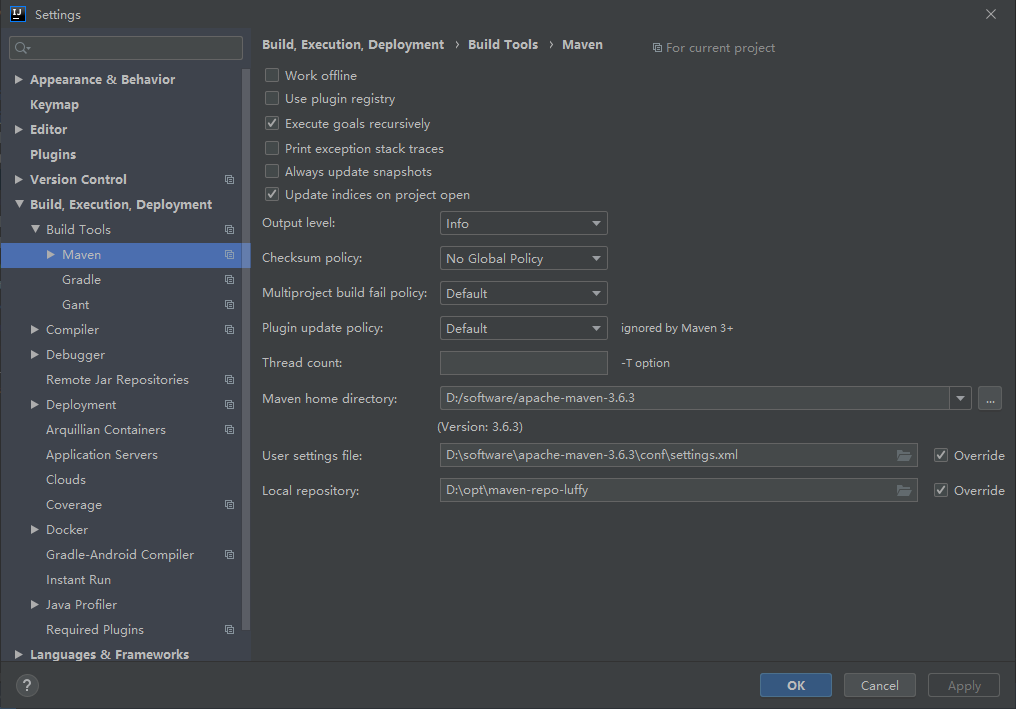
替换springboot版本为2.3.5.RELEASE
直接启动项目并访问本地服务:localhost:8080
编写功能代码
创建controller包及HelloController.java文件
package com.luffy.demo.controller;

import org.springframework.web.bind.annotation.RequestMapping;
import org.springframework.web.bind.annotation.RequestMethod;
import org.springframework.web.bind.annotation.RestController;

@RestController
public class HelloController {

    @RequestMapping(value = "/hello", method = RequestMethod.GET)
    public String hello(String name) {
        return "Hello, " + name;
    }
保存并在浏览器中访问localhost:8080/hello?name=luffy
如果页面复杂,如何实现?
在resources/templates/目录下新建index.html
<!DOCTYPE html>
<html>
<head>
    <title>Devops</title>
    <meta http-equiv="Content-Type" content="text/html; charset=UTF-8" />
</head>
<body>
<div class="container">
    <h3 th:text="${requestname}"></h3>
    <a id="rightaway" href="#" th:href="@{/rightaway}" >立即返回</a>
    <a id="sleep" href="#" th:href="@{/sleep}">延时返回</a>
</div>
</body>
</html>
完善HelloController.java的内容:
package com.luffy.demo.controller;

import org.springframework.web.bind.annotation.RequestMapping;
import org.springframework.web.bind.annotation.RequestMethod;
import org.springframework.web.bind.annotation.RestController;
import org.springframework.web.servlet.ModelAndView;

@RestController
public class HelloController {

    @RequestMapping(value = "/hello", method = RequestMethod.GET)
    public String hello(String name) {
        return "Hello, " + name;
    }

    @RequestMapping("/")
    public ModelAndView index(ModelAndView mv) {
        mv.setViewName("index");
        mv.addObject("requestname", "This is index");
        return mv;
    }

    @RequestMapping("/rightaway")
    public ModelAndView returnRightAway(ModelAndView mv) {
        mv.setViewName("index");
        mv.addObject("requestname","This request is RightawayApi");
        return mv;
    }

    @RequestMapping("/sleep")
    public ModelAndView returnSleep(ModelAndView mv) throws InterruptedException {
        Thread.sleep(2*1000);
        mv.setViewName("index");
        mv.addObject("requestname","This request is SleepApi"+",it will sleep 2s !");
        return mv;
    }
}
如何在java项目中使用maven
为什么需要maven
考虑一个常见的场景:以项目A为例,开发过程中,需要依赖B-2.0.jar的包,如果没有maven,那么正常做法是把B-2.0.jar拷贝到项目A中,但是如果B-2.0.jar还依赖C.jar,我们还需要去找到C.jar的包,因此,在开发阶段需要花费在项目依赖方面的精力会很大。
因此,开发人员需要找到一种方式,可以管理java包的依赖关系,并可以方便的引入到项目中。
maven如何工作
查看pom.xml
        <dependency>
            <groupId>org.springframework.boot</groupId>
            <artifactId>spring-boot-starter-thymeleaf</artifactId>
        </dependency>
可以直接在项目中添加上dependency ,这样来指定项目的依赖包。
思考:如果spring-boot-starter-thymeleaf包依赖别的包,怎么办?
spring-boot-starter-thymeleaf同时也是一个maven项目,也有自己的pom.xml
查看一下:
  <dependencies>
    <dependency>
      <groupId>org.springframework.boot</groupId>
      <artifactId>spring-boot-starter</artifactId>
      <version>2.3.3.RELEASE</version>
      <scope>compile</scope>
    </dependency>
    <dependency>
      <groupId>org.thymeleaf</groupId>
      <artifactId>thymeleaf-spring5</artifactId>
      <version>3.0.11.RELEASE</version>
      <scope>compile</scope>
    </dependency>
    <dependency>
      <groupId>org.thymeleaf.extras</groupId>
      <artifactId>thymeleaf-extras-java8time</artifactId>
      <version>3.0.4.RELEASE</version>
      <scope>compile</scope>
    </dependency>
  </dependencies>
这样的话,使用maven的项目,只需要在自己的pom.xml中把所需的最直接的依赖包定义上,而不用关心这些被依赖的jar包自身是否还有别的依赖。剩下的都交给maven去搞定。
如何搞定?maven可以根据pom.xml中定义的依赖实现包的查找
去哪查找?maven仓库,存储jar包的地方。
当我们执行 Maven 构建命令时,Maven 开始按照以下顺序查找依赖的库:
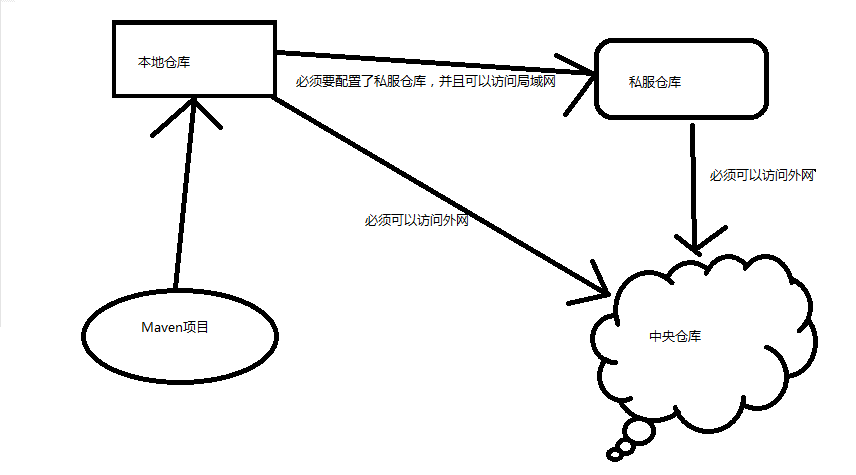
本地仓库:
-
Maven 的本地仓库,在安装 Maven 后并不会创建,它是在第一次执行 maven 命令的时候才被创建。
-
运行 Maven 的时候,Maven 所需要的任何包都是直接从本地仓库获取的。如果本地仓库没有,它会首先尝试从远程仓库下载构件至本地仓库,然后再使用本地仓库的包。
-
默认情况下,不管Linux还是 Windows,每个用户在自己的用户目录下都有一个路径名为 .m2/respository/ 的仓库目录。
-
Maven 本地仓库默认被创建在 %USER_HOME% 目录下。要修改默认位置,在 %M2_HOME%\conf 目录中的 Maven 的 settings.xml 文件中定义另一个路径。
<settings xmlns="http://maven.apache.org/SETTINGS/1.0.0"
          xmlns:xsi="http://www.w3.org/2001/XMLSchema-instance"
          xsi:schemaLocation="http://maven.apache.org/SETTINGS/1.0.0 http://maven.apache.org/xsd/settings-1.0.0.xsd">
  <localRepository>D:\opt\maven-repo</localRepository>
</settings>
中央仓库:
Maven 中央仓库是由 Maven 社区提供的仓库,中央仓库包含了绝大多数流行的开源Java构件,以及源码、作者信息、SCM、信息、许可证信息等。一般来说,简单的Java项目依赖的构件都可以在这里下载到。
中央仓库的关键概念:
- 这个仓库由 Maven 社区管理。
- 不需要配置,maven中集成了地址 http://repo1.maven.org/maven2
- 需要通过网络才能访问。
私服仓库:
通常使用 sonatype Nexus来搭建私服仓库。搭建完成后,需要在 setting.xml中进行配置,比如:
<profile>
    <id>localRepository</id>
    <repositories>
        <repository>
            <id>myRepository</id>
            <name>myRepository</name>
            <url>http://127.0.0.1:8081/nexus/content/repositories/myRepository/</url>
            <releases>
                <enabled>true</enabled>
            </releases>
            <snapshots>
                <enabled>true</enabled>
            </snapshots>
        </repository>
    </repositories>
</profile>
方便起见,我们直接使用国内ali提供的仓库,修改 maven 根目录下的 conf 文件夹中的 setting.xml 文件,在 mirrors 节点上,添加内容如下:
<mirrors>
    <mirror>
      <id>alimaven</id>
      <name>aliyun maven</name>
      <url>http://maven.aliyun.com/nexus/content/groups/public/</url>
      <mirrorOf>central</mirrorOf>
    </mirror>
</mirrors>
在执行构建的时候,maven会自动将所需的包下载到本地仓库中,所以第一次构建速度通常会慢一些,后面速度则很快。
那么maven是如何找到对应的jar包的?
我们可以访问 https://mvnrepository.com/ 查看在仓库中的jar包的样子。
<!-- https://mvnrepository.com/artifact/commons-collections/commons-collections -->
<dependency>
    <groupId>commons-collections</groupId>
    <artifactId>commons-collections</artifactId>
    <version>3.2.2</version>
</dependency>
刚才看到spring-boot-starter-thymeleaf的依赖同样有上述属性,因此maven就可以根据这三项属性,到对应的仓库中去查找到所需要的依赖包,并下载到本地。
其中groupId、artifactId、version共同保证了包在仓库中的唯一性,这也就是为什么maven项目的pom.xml中都先配置这几项的原因,因为项目最终发布到远程仓库中,供别人调用。
思考:我们项目的dependency中为什么没有写version ?
是因为sprintboot项目的上面有人,来看一下项目parent的写法:
    <parent>
        <groupId>org.springframework.boot</groupId>
        <artifactId>spring-boot-starter-parent</artifactId>
        <version>2.3.3.RELEASE</version>
        <relativePath/> <!-- lookup parent from repository -->
    </parent>
parent模块中定义过的dependencies,在子项目中引用的话,不需要指定版本,这样可以保证所有的子项目都使用相同版本的依赖包。
生命周期及mvn命令实践
Maven有三套相互独立的生命周期,分别是clean、default和site。每个生命周期包含一些阶段(phase),阶段是有顺序的,后面的阶段依赖于前面的阶段。
- clean生命周期,清理项目
- 清理:mvn clean –删除target目录,也就是将class文件等删除
- default生命周期,项目的构建等核心阶段
- 编译:mvn compile –src/main/java目录java源码编译生成class (target目录下)
- 测试:mvn test –src/test/java 执行目录下的测试用例
- 打包:mvn package –生成压缩文件:java项目#jar包;web项目#war包,也是放在target目录下
- 安装:mvn install –将压缩文件(jar或者war)上传到本地仓库
- 部署|发布:mvn deploy –将压缩文件上传私服
- site生命周期,建立和发布项目站点
- 站点 : mvn site –生成项目站点文档
各个生命周期相互独立,一个生命周期的阶段前后依赖。 生命周期阶段需要绑定到某个插件的目标才能完成真正的工作,比如test阶段正是与maven-surefire-plugin的test目标相绑定了 。
举例如下:
-
mvn clean
调用clean生命周期的clean阶段
-
mvn test
调用default生命周期的test阶段,实际执行test以及之前所有阶段
-
mvn clean install
调用clean生命周期的clean阶段和default的install阶段,实际执行clean,install以及之前所有阶段
在linux环境中演示:
创建gitlab组,luffy-spring-cloud,在该组下创建项目springboot-demo
-
提交代码到git仓库
$ git init $ git remote add origin http://gitlab.luffy.com/luffy-spring-cloud/springboot-demo.git $ git add . $ git commit -m "Initial commit" $ git push -u origin master -
使用tools容器来运行
$ docker run --rm -ti 172.21.51.67:5000/devops/tools:v3 bash
bash-5.0# mvn -v
bash: mvn: command not found
# 由于idea工具自带了maven,所以可以直接在ide中执行mvn命令。在tools容器中,需要安装mvn命令
为tools镜像集成mvn:
将本地的
apache-maven-3.6.3放到tools项目中,修改settings.xml配置... <localRepository>/opt/maven-repo</localRepository> ...然后修改Dockerfile,添加如下部分:
#-----------------安装 maven--------------------#
COPY apache-maven-3.6.3 /usr/lib/apache-maven-3.6.3
RUN ln -s /usr/lib/apache-maven-3.6.3/bin/mvn /usr/local/bin/mvn && chmod +x /usr/local/bin/mvn
ENV MAVEN_HOME=/usr/lib/apache-maven-3.6.3
#------------------------------------------------#
去master节点拉取最新代码,构建最新的tools镜像:
  # k8s-master节点
  $ git pull
  $ docker build . -t 172.21.51.67:5000/devops/tools:v4 -f Dockerfile
  $ docker push 172.21.51.67:5000/devops/tools:v4
再次尝试mvn命令:
$ docker run --rm -ti 172.21.51.67:5000/devops/tools:v4 bash
  bash-5.0# mvn -v
  bash-5.0# git clone http://gitlab.luffy.com/luffy-spring-cloud/springboot-demo.git
  bash-5.0# cd springboot-demo
  bash-5.0# mvn clean
  # 观察/opt/maven目录
  bash-5.0# mvn package
  # 多阶段组合
  bash-5.0# mvn clean package
想系统学习maven,可以参考: https://www.runoob.com/maven/maven-pom.html
Springboot服务镜像制作
通过mvn package命令拿到服务的jar包后,我们可以使用如下命令启动服务:
$ java -jar demo-0.0.1-SNAPSHOT.jar
因此,需要准备Dockerfile来构建镜像:
FROM openjdk:8-jdk-alpine
COPY target/springboot-demo-0.0.1-SNAPSHOT.jar app.jar
CMD [ "sh", "-c", "java -jar /app.jar" ]
我们可以为构建出的镜像指定名称:
    <build>
        <finalName>${project.artifactId}</finalName><!--打jar包去掉版本号-->
    ...
Dockerfile对应修改:
FROM openjdk:8-jdk-alpine
COPY target/springboot-demo.jar app.jar
CMD [ "sh", "-c", "java -jar /app.jar" ]
执行镜像构建,验证服务启动是否正常:
$ docker build . -t springboot-demo:v1 -f Dockerfile

$ docker run -d --name springboot-demo -p 8080:8080 springboot-demo:v1

$ curl localhost:8080
接入CICD流程
之前已经实现了shared-library,并且把python项目接入到了CICD 流程中。因此,可以直接使用已有的流程,把spring boot项目接入进去。
Jenkinsfilesonar-project.propertiesdeploy/deployment.yamldeploy/service.yamldeploy/ingress.yamlconfigmap/devops-config
Jenkinsfile
@Library('luffy-devops') _

pipeline {
    agent { label 'jnlp-slave'}
    options {
		timeout(time: 20, unit: 'MINUTES')
		gitLabConnection('gitlab')
	}
    environment {
        IMAGE_REPO = "172.21.51.67:5000/demo/springboot-demo"
        IMAGE_CREDENTIAL = "credential-registry"
        DINGTALK_CREDS = credentials('dingTalk')
        PROJECT = "springboot-demo"
    }
    stages {
        stage('checkout') {
            steps {
                container('tools') {
                    checkout scm
                }
            }
        }
        stage('mvn-package') {
            steps {
                container('tools') {
                    script{
                        sh 'mvn clean package'
                    }
                }
            }
        }
        stage('CI'){
            failFast true
            parallel {
                stage('Unit Test') {
                    steps {
                        echo "Unit Test Stage Skip..."
                    }
                }
                stage('Code Scan') {
                    steps {
                        container('tools') {
                            script {
                               devops.scan().start()
                            }
                        }
                    }
                }
            }
        }

        stage('docker-image') {
            steps {
                container('tools') {
                    script{
                        devops.docker(
                            "${IMAGE_REPO}",
                            "${GIT_COMMIT}",
                            IMAGE_CREDENTIAL
                        ).build().push()
                    }
                }
            }
        }
        stage('deploy') {
            steps {
                container('tools') {
                    script{
                    	devops.deploy("deploy",true,"deploy/deployment.yaml").start()
                    }
                }
            }
        }
    }
    post {
        success {
            script{
                devops.notificationSuccess(PROJECT,"dingTalk")
            }
        }
        failure {
            script{
                devops.notificationFailure(PROJECT,"dingTalk")
            }
        }
    }
}
sonar-project.properties
sonar.projectKey=springboot-demo
sonar.projectName=springboot-demo
# if you want disabled the DTD verification for a proxy problem for example, true by default
# JUnit like test report, default value is test.xml
sonar.sources=src/main/java
sonar.language=java
sonar.tests=src/test/java
sonar.java.binaries=target/classes
deploy/deployment.yaml
apiVersion: apps/v1
kind: Deployment
metadata:
  name: springboot-demo
  namespace: {{NAMESPACE}}
spec:
  replicas: 1
  selector:
    matchLabels:
      app: springboot-demo
  template:
    metadata:
      labels:
        app: springboot-demo
    spec:
      containers:
        - name: springboot-demo
          image: {{IMAGE_URL}}
          imagePullPolicy: IfNotPresent
          ports:
            - containerPort: 8080
          resources:
            requests:
              memory: 100Mi
              cpu: 50m
            limits:
              memory: 500Mi
              cpu: 100m
          livenessProbe:
            httpGet:
              path: /
              port: 8080
              scheme: HTTP
            initialDelaySeconds: 120
            periodSeconds: 15
            timeoutSeconds: 3
          readinessProbe:
            httpGet:
              path: /
              port: 8080
              scheme: HTTP
            initialDelaySeconds: 120
            timeoutSeconds: 2
            periodSeconds: 15
deploy/service.yaml
apiVersion: v1
kind: Service
metadata:
  name: springboot-demo
  namespace: {{NAMESPACE}}
spec:
  ports:
    - port: 8080
      protocol: TCP
      targetPort: 8080
  selector:
    app: springboot-demo
  sessionAffinity: None
  type: ClusterIP
status:
  loadBalancer: {}
deploy/ingress.yaml
apiVersion: extensions/v1beta1
kind: Ingress
metadata:
  name: springboot-demo
  namespace: {{NAMESPACE}}
spec:
  rules:
    - host: {{INGRESS_SPRINGBOOTDEMO}}
      http:
        paths:
          - backend:
              serviceName: springboot-demo
              servicePort: 8080
            path: /
status:
  loadBalancer: {}
维护devops-config的configmap,添加INGRESS_SPRINGBOOTDEMO配置项:
$ kubectl -n dev edit cm devops-config
...
data:
  INGRESS_MYBLOG: blog-dev.luffy.com
  INGRESS_SPRINGBOOTDEMO: springboot-dev.luffy.com
  NAMESPACE: dev
...
更新Jenkins中的jnlp-slave-pod模板镜像:
172.21.51.67:5000/devops/tools:v4
由于镜像中maven的目录是/opt/maven-repo,而slave-pod是执行完任务后会销毁,因此需要将maven的数据目录挂载出来,不然每次构建都会重新拉取所有依赖的jar包:

配置Jenkins流水线:
添加单元测试覆盖率
单元测试这块内容一直没有把覆盖率统计到sonarqube端,本节看下怎么样将单元测试的结果及覆盖率展示到Jenkins及sonarqube平台中。
为了展示效果,我们先添加一个单元测试文件HelloControllerTest:
package com.luffy.demo;

import org.junit.jupiter.api.BeforeEach;
import org.junit.jupiter.api.Test;
import org.slf4j.Logger;
import org.slf4j.LoggerFactory;
import org.springframework.beans.factory.annotation.Autowired;
import org.springframework.boot.test.context.SpringBootTest;
import org.springframework.http.MediaType;
import org.springframework.test.context.web.WebAppConfiguration;
import org.springframework.test.web.servlet.MockMvc;
import org.springframework.test.web.servlet.request.MockMvcRequestBuilders;
import org.springframework.test.web.servlet.result.MockMvcResultHandlers;
import org.springframework.test.web.servlet.result.MockMvcResultMatchers;
import org.springframework.test.web.servlet.setup.MockMvcBuilders;
import org.springframework.web.context.WebApplicationContext;

@SpringBootTest
@WebAppConfiguration
public class HelloControllerTests {

    private static final Logger logger = LoggerFactory.getLogger(HelloControllerTests.class);
    @Autowired
    private WebApplicationContext webApplicationContext;

    private MockMvc mockMvc;

    @BeforeEach
    public void setMockMvc() {
        mockMvc = MockMvcBuilders.webAppContextSetup(webApplicationContext).build();
    }

    @Test
    public void index(){
        try {
            mockMvc.perform(MockMvcRequestBuilders.post("/")
                    .contentType(MediaType.APPLICATION_JSON)
            ).andExpect(MockMvcResultMatchers.status().isOk())
                    .andDo(MockMvcResultHandlers.print());
        }catch (Exception e) {
            e.printStackTrace();
        }

    }

    @Test
    public void rightaway(){
        try {
            mockMvc.perform(MockMvcRequestBuilders.post("/rightaway")
                    .contentType(MediaType.APPLICATION_JSON)
            ).andExpect(MockMvcResultMatchers.status().isOk())
                    .andDo(MockMvcResultHandlers.print());
        }catch (Exception e) {
            e.printStackTrace();
        }

    }

    @Test
    public void sleep(){
        try {
            mockMvc.perform(MockMvcRequestBuilders.post("/sleep")
                    .contentType(MediaType.APPLICATION_JSON)
            ).andExpect(MockMvcResultMatchers.status().isOk())
                    .andDo(MockMvcResultHandlers.print());
        }catch (Exception e) {
            e.printStackTrace();
        }

    }
}
jacoco:监控JVM中的调用,生成监控结果(默认保存在jacoco.exec文件中),然后分析此结果,配合源代码生成覆盖率报告。
如何引入jacoco测试:
            <plugin>
                <groupId>org.jacoco</groupId>
                <artifactId>jacoco-maven-plugin</artifactId>
                <version>0.7.8</version>
                <executions>
                    <execution>
                        <goals>
                            <goal>prepare-agent</goal>
                        </goals>
                        <configuration>
                            <destFile>${project.build.directory}/coverage-reports/jacoco.exec</destFile>
                        </configuration>
                    </execution>
                    <execution>
                        <id>default-report</id>
                        <phase>test</phase>
                        <goals>
                            <goal>report</goal>
                        </goals>
                        <configuration>
                            <dataFile>${project.build.directory}/coverage-reports/jacoco.exec</dataFile>
                            <outputDirectory>${project.reporting.outputDirectory}/jacoco</outputDirectory>
                        </configuration>
                    </execution>
                </executions>
            </plugin>
其中:
prepare-agent,会把agent准备好,这样在执行用例的时候,就会使用agent检测到代码执行的过程,通常将结果保存在jacoco.exec中report,分析保存的jacoco.exec文件,生成报告
在IDE中添加,观察插件的goal,执行mvn test,观察执行过程。
有了上述内容后,如何将结果发布到sonarqube中?
提交最新代码,查看sonarqube的分析结果。

Spring Cloud开发、交付实践
https://spring.io/projects/spring-cloud#overview
1、Netflix是一家做视频的网站,可以这么说该网站上的美剧应该是最火的。
2、Netflix是一家没有CTO的公司,正是这样的组织架构能使产品与技术无缝的沟通,从而能快速迭代出更优秀的产品。在当时软件敏捷开发中,Netflix的更新速度不亚于当年的微信后台变更,虽然微信比Netflix迟发展,但是当年微信的灰度发布和敏捷开发应该算是业界最猛的。
3、Netflix由于做视频的原因,访问量非常的大,从而促使其技术快速的发展在背后支撑着,也正是如此,Netflix开始把整体的系统往微服务上迁移。
4、Netflix的微服务做的不是最早的,但是确是最大规模的在生产级别微服务的尝试。也正是这种大规模的生产级别尝试,在服务器运维上依托AWS云。当然AWS云同样受益于Netflix的大规模业务不断的壮大。
5、Netflix的微服务大规模的应用,在技术上毫无保留的把一整套微服务架构核心技术栈开源了出来,叫做Netflix OSS,也正是如此,在技术上依靠开源社区的力量不断的壮大。
6、Spring Cloud是构建微服务的核心,而Spring Cloud是基于Spring Boot来开发的。
7、Pivotal在Netflix开源的一整套核心技术产品线的同时,做了一系列的封装,就变成了Spring Cloud;虽然Spring Cloud到现在为止不只有Netflix提供的方案可以集成,还有很多方案,但Netflix是最成熟的。
本课程基于SpringBoot 2.3.6.RELEASE 和Spring Cloud Hoxton.SR9版本
微服务场景
开发APP,提供个人的花呗账单管理。
- 注册、登录、账单查询
- 用户服务,账单管理服务
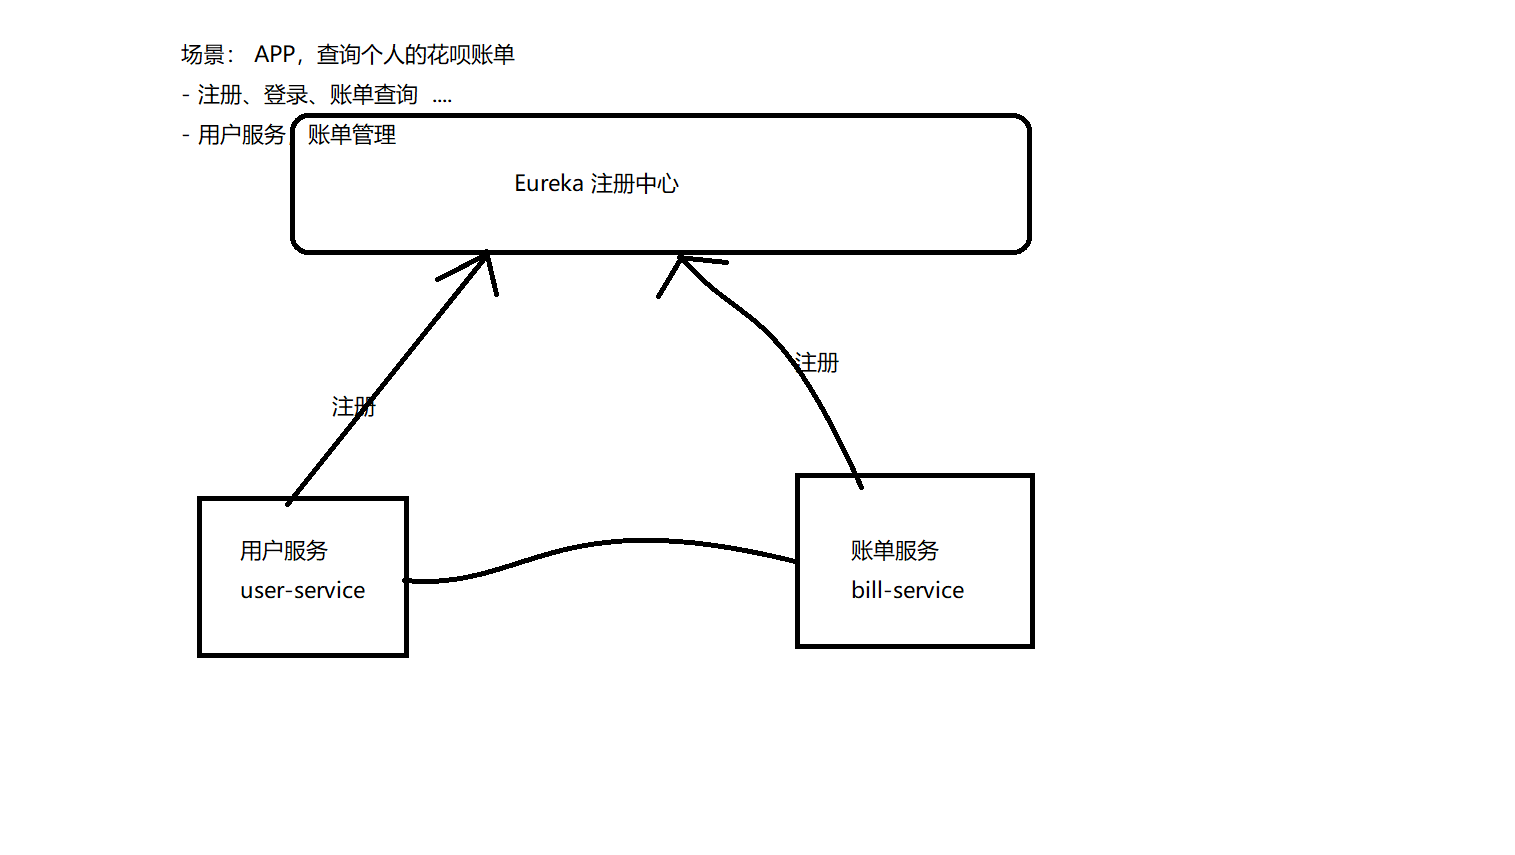

Eureka服务注册中心
在SpringCloud体系中,我们知道服务之间的调用是通过http协议进行调用的。而注册中心的主要目的就是维护这些服务的服务列表。
https://docs.spring.io/spring-cloud-netflix/docs/2.2.5.RELEASE/reference/html/
新建项目
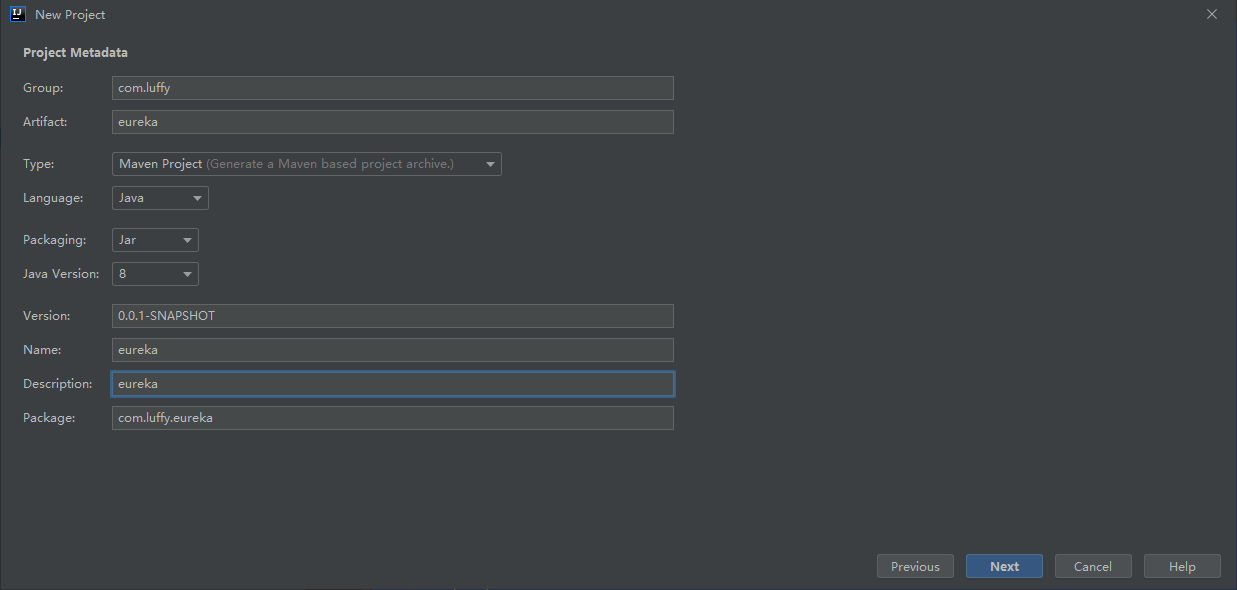
pom中引入spring-cloud的依赖:
https://spring.io/projects/spring-cloud#overview

<properties>
    <spring.cloud-version>Hoxton.SR9</spring.cloud-version>
</properties>
<dependencyManagement>
    <dependencies>
        <dependency>
            <groupId>org.springframework.cloud</groupId>
            <artifactId>spring-cloud-dependencies</artifactId>
            <version>${spring.cloud-version}</version>
            <type>pom</type>
            <scope>import</scope>
        </dependency>
    </dependencies>
</dependencyManagement>
引入eureka-server的依赖:
        <dependency>
            <groupId>org.springframework.cloud</groupId>
            <artifactId>spring-cloud-starter-netflix-eureka-server</artifactId>
        </dependency>
启动eureka服务
application.yml
server:
  port: 8761

eureka:
  client:
    service-url:
      defaultZone: http://${eureka.instance.hostname}:${server.port}/eureka/
    register-with-eureka: false
    fetch-registry: false
  instance:
    hostname: localhost
启动类:
package com.luffy.eureka;

import org.springframework.boot.SpringApplication;
import org.springframework.boot.autoconfigure.SpringBootApplication;
import org.springframework.cloud.netflix.eureka.server.EnableEurekaServer;

@SpringBootApplication
@EnableEurekaServer
public class EurekaServerApplication {
    public static void main(String[] args) {
        SpringApplication.run(EurekaServerApplication.class, args);
    }
}
启动访问localhost:8761测试
创建spring cloud项目三部曲:
- 引入依赖包
- 修改application.yml配置文件
- 启动类添加注解
eureka认证
没有认证,不安全,添加认证:
        <dependency>
            <groupId>org.springframework.boot</groupId>
            <artifactId>spring-boot-starter-security</artifactId>
        </dependency>
application.yml
server:
  port: 8761
eureka:
  client:
    service-url:
      defaultZone: http://${spring.security.user.name}:${spring.security.user.password}@${eureka.instance.hostname}:${server.port}/eureka/
    register-with-eureka: false
    fetch-registry: false
  instance:
    hostname: localhost
spring:
  security:
    user:
      name: ${EUREKA_USER:admin}
      password: ${EUREKA_PASS:admin}
注册服务到eureka
新建项目,user-service(选择Spring Cloud依赖和SpringBoot Web依赖),用来提供用户查询功能。
三部曲:
- pom.xml,并添加依赖
- 创建application.yml配置文件
- 创建Springboot启动类,并配置注解
pom.xml添加:
        <dependency>
            <groupId>org.springframework.cloud</groupId>
            <artifactId>spring-cloud-starter-netflix-eureka-client</artifactId>
        </dependency>
        <dependency>
            <groupId>org.springframework.boot</groupId>
            <artifactId>spring-boot-starter-web</artifactId>
        </dependency>
application.yml
server:
  port: 7000
eureka:
  client:
    serviceUrl:
      defaultZone: http://${EUREKA_USER:admin}:${EUREKA_PASS:admin}@localhost:8761/eureka/
启动类:
package com.luffy.user;

import org.springframework.boot.SpringApplication;
import org.springframework.boot.autoconfigure.SpringBootApplication;
import org.springframework.cloud.client.discovery.EnableDiscoveryClient;

//注意这里也可使用@EnableEurekaClient
//但由于springcloud是灵活的,注册中心支持eureka、consul、zookeeper等
//若写了具体的注册中心注解,则当替换成其他注册中心时,又需要替换成对应的注解了。
//所以 直接使用@EnableDiscoveryClient 启动发现。
//这样在替换注册中心时,只需要替换相关依赖即可。
@EnableDiscoveryClient
@SpringBootApplication
public class UserServiceApplication {
    public static void main(String[] args) {
        SpringApplication.run(UserServiceApplication.class, args);
    }
}
报错:
c.n.d.s.t.d.RetryableEurekaHttpClient : Request execution failed with message: com.fasterxml.jackson.databind.exc.MismatchedInputException: Root name 'timestamp' does not match expected ('instance') for type [simple type, class com.netflix.appinfo.InstanceInfo]
新版本的security默认开启csrf了,关掉,在注册中心新建一个类,继承WebSecurityConfigurerAdapter来关闭 ,> 注意,是在eureka server端关闭。
package com.luffy.eureka;

import org.springframework.context.annotation.Configuration;
import org.springframework.security.config.annotation.web.builders.HttpSecurity;
import org.springframework.security.config.annotation.web.configuration.EnableWebSecurity;
import org.springframework.security.config.annotation.web.configuration.WebSecurityConfigurerAdapter;

@EnableWebSecurity
@Configuration
public class WebSecurityConfig extends WebSecurityConfigurerAdapter {

    @Override
    protected void configure(HttpSecurity http) throws Exception {
        http.csrf().disable(); //关闭csrf
        http.authorizeRequests().anyRequest().authenticated().and().httpBasic(); //开启认证
    }
}
再次启动发现可以注册,但是地址是
application.yaml
server:
  port: 7000
eureka:
  client:
    serviceUrl:
      defaultZone: http://${EUREKA_USER:admin}:${EUREKA_PASS:admin}@localhost:8761/eureka/
  instance:
    instance-id: ${eureka.instance.hostname}:${server.port}
    prefer-ip-address: true
    hostname: user-service
spring:
  application:
    name: user-service
Eurake有一个配置参数eureka.server.renewalPercentThreshold,定义了renews 和renews threshold的比值,默认值为0.85。当server在15分钟内,比值低于percent,即少了15%的微服务心跳,server会进入自我保护状态
默认情况下,如果Eureka Server在一定时间内没有接收到某个微服务实例的心跳,Eureka Server将会注销该实例(默认90秒)。但是当网络分区故障发生时,微服务与Eureka Server之间无法正常通信,这就可能变得非常危险了,因为微服务本身是健康的,此时本不应该注销这个微服务。
Eureka Server通过“自我保护模式”来解决这个问题,当Eureka Server节点在短时间内丢失过多客户端时(可能发生了网络分区故障),那么这个节点就会进入自我保护模式。一旦进入该模式,Eureka Server就会保护服务注册表中的信息,不再删除服务注册表中的数据(也就是不会注销任何微服务)。当网络故障恢复后,该Eureka Server节点会自动退出自我保护模式。
自我保护模式是一种对网络异常的安全保护措施。使用自我保护模式,而让Eureka集群更加的健壮、稳定。
开发阶段可以通过配置:eureka.server.enable-self-preservation=false关闭自我保护模式。
生产阶段,理应以默认值进行配置。
至于具体具体的配置参数,可至官网查看:http://cloud.spring.io/spring-cloud-static/Finchley.RELEASE/single/spring-cloud.html#_appendix_compendium_of_configuration_properties
高可用
高可用:
- 优先保证可用性
- 各个节点都是平等的,1个节点挂掉不会影响正常节点的工作,剩余的节点依然可以提供注册和查询服务
- 在向某个Eureka注册时如果发现连接失败,则会自动切换至其它节点,只要有一台Eureka还在,就能保证注册服务可用(保证可用性)
注意点:
-
多实例的话eureka.instance.instance-id需要保持不一样,否则会当成同一个
-
eureka.instance.hostname要与defaultZone里的地址保持一致
-
各个eureka的spring.application.name相同

拷贝eureka服务,分别命名eureka-ha-peer1和eureka-ha-peer2
修改模块的pom.xml
<artifactId>eureka-ha-peer1</artifactId>
修改配置文件application.yml,注意集群服务,需要各个eureka的spring.application.name相同
server:
  port: ${EUREKA_PORT:8762}
eureka:
  client:
    service-url:
      defaultZone: ${EUREKA_SERVER:http://${spring.security.user.name}:${spring.security.user.password}@peer1:8762/eureka/,http://${spring.security.user.name}:${spring.security.user.password}@peer2:8763/eureka/}
    fetch-registry: true
  instance:
    instance-id: ${eureka.instance.hostname}:${server.port}
    hostname: peer1
spring:
  security:
    user:
      name: ${EUREKA_USER:admin}
      password: ${EUREKA_PASS:admin}
  application:
    name: eureka-cluster
设置hosts文件
127.0.0.1 peer1 peer2
服务提供者若想连接高可用的eureka,需要修改:
defaultZone: http://${EUREKA_USER:admin}:${EUREKA_PASS:admin}@peer1:8762/eureka/,http://${EUREKA_USER:admin}:${EUREKA_PASS:admin}@peer2:8763/eureka/
k8s交付
分析:
高可用互相注册,但是需要知道对方节点的地址。k8s中pod ip是不固定的,如何将高可用的eureka服务使用k8s交付?
-
方案一:创建三个Deployment+三个Service
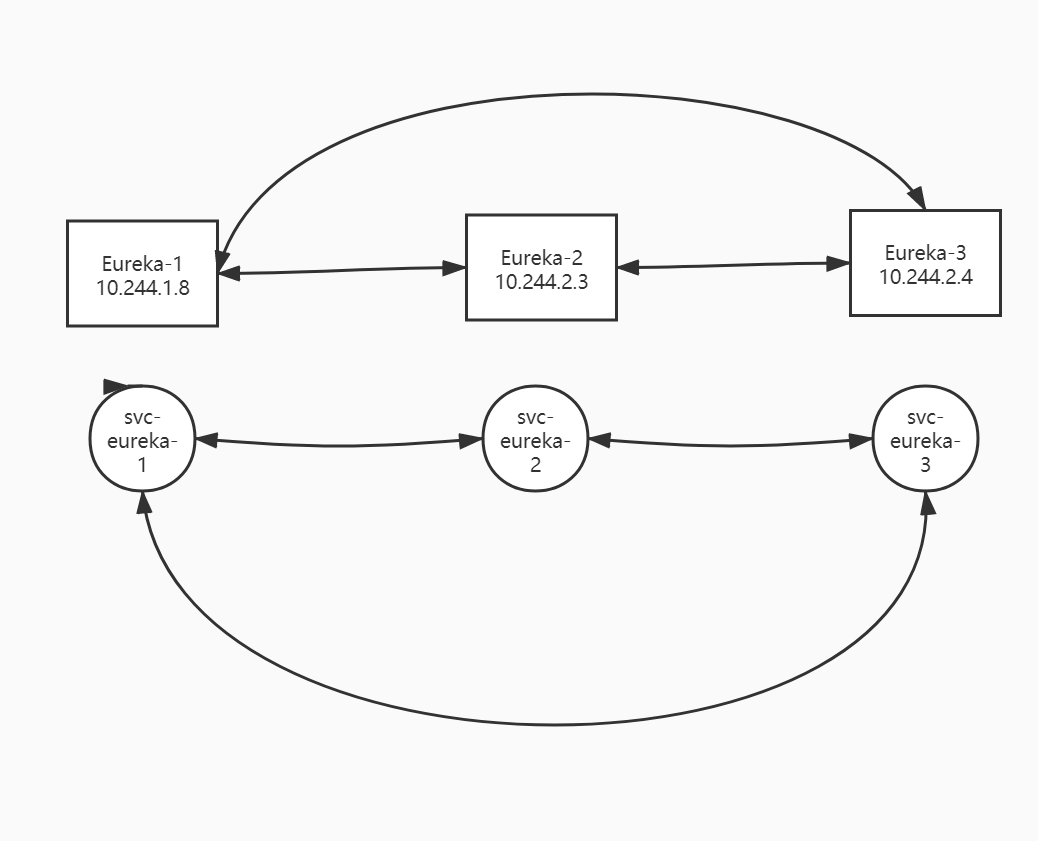
-
方案二:使用statefulset管理
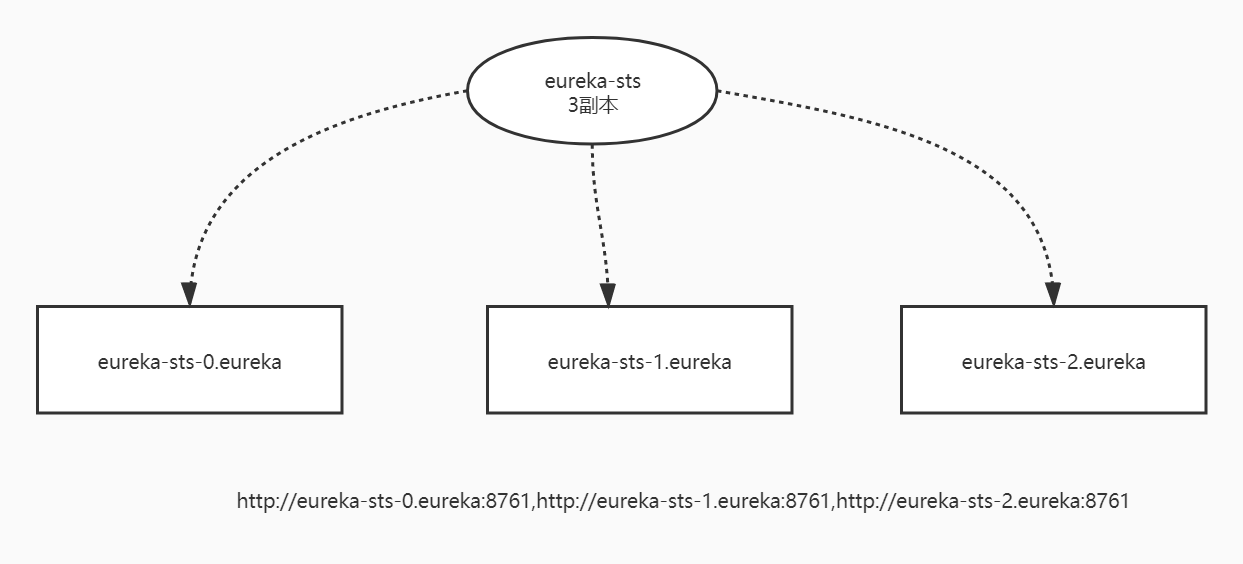
eureka-statefulset.yaml
# eureka-statefulset.yaml
apiVersion: apps/v1
kind: StatefulSet
metadata:
  name: eureka-cluster
  namespace: dev
spec:
  serviceName: "eureka"
  replicas: 3
  selector:
    matchLabels:
      app: eureka-cluster
  template:
    metadata:
      labels:
        app: eureka-cluster
    spec:
      containers:
        - name: eureka
          image: 172.21.51.67:5000/spring-cloud/eureka-cluster:v1
          ports:
            - containerPort: 8761
          resources:
            requests:
              memory: 400Mi
              cpu: 50m
            limits:
              memory: 2Gi
              cpu: 2000m
          env:
            - name: MY_POD_NAME
              valueFrom:
                fieldRef:
                  fieldPath: metadata.name
            - name: JAVA_OPTS
              value: -XX:+UnlockExperimentalVMOptions
                -XX:+UseCGroupMemoryLimitForHeap
                -XX:MaxRAMFraction=2
                -XX:CICompilerCount=8
                -XX:ActiveProcessorCount=8
                -XX:+UseG1GC
                -XX:+AggressiveOpts
                -XX:+UseFastAccessorMethods
                -XX:+UseStringDeduplication
                -XX:+UseCompressedOops
                -XX:+OptimizeStringConcat
            - name: EUREKA_SERVER
              value: "http://admin:admin@eureka-cluster-0.eureka:8761/eureka/,http://admin:admin@eureka-cluster-1.eureka:8761/eureka/,http://admin:admin@eureka-cluster-2.eureka:8761/eureka/"
            - name: EUREKA_INSTANCE_HOSTNAME
              value: ${MY_POD_NAME}.eureka
            - name: EUREKA_PORT
              value: "8761"
eureka-headless-service.yaml
apiVersion: v1
kind: Service
metadata:
  name: eureka
  namespace: dev
  labels:
    app: eureka
spec:
  ports:
    - port: 8761
      name: eureka
  clusterIP: None
  selector:
    app: eureka-cluster
想通过ingress访问eureka,需要使用有头服务
apiVersion: v1
kind: Service
metadata:
  name: eureka-ingress
  namespace: dev
  labels:
    app: eureka-cluster
spec:
  ports:
    - port: 8761
      name: eureka-cluster
  selector:
    app: eureka-cluster
---
apiVersion: extensions/v1beta1
kind: Ingress
metadata:
  name: eureka-cluster
  namespace: dev
spec:
  rules:
    - host: eureka-cluster.luffy.com
      http:
        paths:
          - backend:
              serviceName: eureka-ingress
              servicePort: 8761
            path: /
status:
  loadBalancer: {}
使用StatefulSet管理有状态服务
使用StatefulSet创建多副本pod的情况:
apiVersion: apps/v1
kind: StatefulSet
metadata:
  name: nginx-statefulset
  labels:
    app: nginx-sts
spec:
  replicas: 3
  serviceName: "nginx"
  selector:
    matchLabels:
      app: nginx-sts
  template:
    metadata:
      labels:
        app: nginx-sts
    spec:
      containers:
      - name: nginx
        image: nginx:alpine
        ports:
        - containerPort: 80
无头服务Headless Service
kind: Service
apiVersion: v1
metadata:
  name: nginx
spec:
  selector:
    app: nginx-sts
  ports:
  - protocol: TCP
    port: 80
    targetPort: 80
  clusterIP: None
$ kubectl -n spring exec  -ti nginx-statefulset-0 sh
/ # curl nginx-statefulset-2.nginx
接入CICD流程
所需的文件:
在pom.xml中重写jar包名称:
<finalName>${project.artifactId}</finalName>
Dockerfile
FROM openjdk:8-jdk-alpine
ADD target/eureka.jar app.jar
ENV JAVA_OPTS=""
CMD [ "sh", "-c", "java $JAVA_OPTS -jar /app.jar" ]
Jenkinsfile
@Library('luffy-devops') _

pipeline {
    agent { label 'jnlp-slave'}
    options {
		timeout(time: 20, unit: 'MINUTES')
		gitLabConnection('gitlab')
	}
    environment {
        IMAGE_REPO = "172.21.51.67:5000/spring-cloud/eureka-cluster"
        IMAGE_CREDENTIAL = "credential-registry"
        DINGTALK_CREDS = credentials('dingTalk')
        PROJECT = "eureka-cluster"
    }
    stages {
        stage('checkout') {
            steps {
                container('tools') {
                    checkout scm
                }
            }
        }
        stage('mvn-package') {
            steps {
                container('tools') {
                    script{
                        sh 'mvn clean package'
                    }
                }
            }
        }
        stage('CI'){
            failFast true
            parallel {
                stage('Unit Test') {
                    steps {
                        echo "Unit Test Stage Skip..."
                    }
                }
                stage('Code Scan') {
                    steps {
                        container('tools') {
                            script {
                               devops.scan().start()
                            }
                        }
                    }
                }
            }
        }

        stage('docker-image') {
            steps {
                container('tools') {
                    script{
                        devops.docker(
                            "${IMAGE_REPO}",
                            "${GIT_COMMIT}",
                            IMAGE_CREDENTIAL
                        ).build().push()
                    }
                }
            }
        }
        stage('deploy') {
            steps {
                container('tools') {
                    script{
                    	devops.deploy("deploy",false,"deploy/statefulset.yaml").start()
                    }
                }
            }
        }
    }
    post {
        success {
            script{
                devops.notificationSuccess(PROJECT,"dingTalk")
            }
        }
        failure {
            script{
                devops.notificationFailure(PROJECT,"dingTalk")
            }
        }
    }
}
sonar-project.properties
sonar.projectKey=eureka-cluster
sonar.projectName=eureka-cluster
# if you want disabled the DTD verification for a proxy problem for example, true by default
# JUnit like test report, default value is test.xml
sonar.sources=src/main/java
sonar.language=java
sonar.tests=src/test/java
sonar.java.binaries=target/classes
模板化k8s资源清单:
# eureka-statefulset.yaml
apiVersion: apps/v1
kind: StatefulSet
metadata:
  name: eureka-cluster
  namespace: {{NAMESPACE}}
spec:
  serviceName: "eureka"
  replicas: 3
  selector:
    matchLabels:
      app: eureka-cluster
  template:
    metadata:
      labels:
        app: eureka-cluster
    spec:
      containers:
        - name: eureka
          image: {{IMAGE_URL}}
...
维护新组件的ingress:
$ kubectl -n dev edit configmap devops-config
...
  INGRESS_EUREKA: eureka.luffy.com
...
部署k8s集群时,将eureka的集群地址通过参数的形式传递到pod内部,因此本地开发时,直接按照单点模式进行:
server:
  port: ${EUREKA_PORT:8761}
eureka:
  client:
    service-url:
      defaultZone: ${EUREKA_SERVER:http://${spring.security.user.name}:${spring.security.user.password}@localhost:8761/eureka/}
    fetch-registry: true
    register-with-eureka: true
  instance:
    instance-id: ${eureka.instance.hostname}:${server.port}
    hostname: ${EUREKA_INSTANCE_HOSTNAME:localhost}
    prefer-ip-address: true
spring:
  security:
    user:
      name: ${EUREKA_USER:admin}
      password: ${EUREKA_PASS:admin}
  application:
    name: eureka-cluster
提交项目:
创建develop分支,CICD部署开发环境
停掉eureka-ha
微服务间调用
服务提供者
前面已经将用户服务注册到了eureka注册中心,但是还没有暴漏任何API给服务消费者调用。
新建controller类:
package com.luffy.userservice.controller;


import com.luffy.userservice.entity.User;
import org.springframework.web.bind.annotation.GetMapping;
import org.springframework.web.bind.annotation.PathVariable;
import org.springframework.web.bind.annotation.RestController;

import java.util.Random;

@RestController
public class UserController {

    @GetMapping("/user")
    public String getUserService(){
        return "this is user-service";
    }

    @GetMapping("/user-nums")
    public Integer getUserNums(){
        return new Random().nextInt(100);
    }

    //{"id": 123, "name": "张三", "age": 20, "sex": "male"}
    @GetMapping("/user/{id}")
    public User getUserInfo(@PathVariable("id") int id){
        User user = new User();
        user.setId(id);
        user.setAge(20);
        user.setName("zhangsan");
        user.setSex("male");
        return user;
    }
}
实体类User.java
package com.luffy.userservice.entity;

public class User {
    private int id;
    private String name;
    private int age;
    private String sex;

    public int getAge() {
        return age;
    }

    public int getId() {
        return id;
    }

    public String getName() {
        return name;
    }

    public String getSex() {
        return sex;
    }

    public void setAge(int age) {
        this.age = age;
    }

    public void setId(int id) {
        this.id = id;
    }

    public void setName(String name) {
        this.name = name;
    }

    public void setSex(String sex) {
        this.sex = sex;
    }
}
application.yml
增加从环境变量中读取EUREKA_SERVER和EUREKA_INSTANCE_HOSTNAME配置
server:
  port: 7000
eureka:
  client:
    serviceUrl:
      defaultZone: ${EUREKA_SERVER:http://admin:admin@localhost:8761/eureka/}
  instance:
    instance-id: ${eureka.instance.hostname}:${server.port}
    prefer-ip-address: true
    hostname: ${INSTANCE_HOSTNAME:user-service}
spring:
  application:
    name: user-service
CICD持续交付服务提供者
deployment.yaml
apiVersion: apps/v1
kind: Deployment
metadata:
  name: user-service
  namespace: {{NAMESPACE}}
spec:
  replicas: 1
  selector:
    matchLabels:
      app: user-service
  template:
    metadata:
      labels:
        app: user-service
    spec:
      containers:
        - name: user-service
          image: {{IMAGE_URL}}
          imagePullPolicy: IfNotPresent
          ports:
            - containerPort: 7000
          resources:
            requests:
              memory: 400Mi
              cpu: 50m
            limits:
              memory: 2Gi
              cpu: 2000m
          env:
            - name: JAVA_OPTS
              value: -XX:+UnlockExperimentalVMOptions
                -XX:+UseCGroupMemoryLimitForHeap
                -XX:MaxRAMFraction=2
                -XX:CICompilerCount=8
                -XX:ActiveProcessorCount=8
                -XX:+UseG1GC
                -XX:+AggressiveOpts
                -XX:+UseFastAccessorMethods
                -XX:+UseStringDeduplication
                -XX:+UseCompressedOops
                -XX:+OptimizeStringConcat
            - name: EUREKA_SERVER
              value: "http://admin:admin@eureka-cluster-0.eureka:8761/eureka/,http://admin:admin@eureka-cluster-1.eureka:8761/eureka/,http://admin:admin@eureka-cluster-2.eureka:8761/eureka/"
            - name: INSTANCE_HOSTNAME
              valueFrom:
                fieldRef:
                  fieldPath: metadata.name
service.yaml
apiVersion: v1
kind: Service
metadata:
  name: user-service
  namespace: {{NAMESPACE}}
spec:
  ports:
    - port: 7000
      protocol: TCP
      targetPort: 7000
  selector:
    app: user-service
  sessionAffinity: None
  type: ClusterIP
status:
  loadBalancer: {}
ingress.yaml
apiVersion: extensions/v1beta1
kind: Ingress
metadata:
  name: user-service
  namespace: {{NAMESPACE}}
spec:
  rules:
    - host: {{INGRESS_USER_SERVICE}}
      http:
        paths:
          - backend:
              serviceName: user-service
              servicePort: 7000
            path: /
status:
  loadBalancer: {}
ingress配置:
$ kubectl -n dev edit configmap devops-config
...
data:
  INGRESS_MYBLOG: blog-dev.luffy.com
  INGRESS_SPRINGBOOTDEMO: springboot-dev.luffy.com
  INGRESS_USER_SERVICE: user-service-dev.luffy.com
  NAMESPACE: dev
...
Jenkinsfile
@Library('luffy-devops') _

pipeline {
    agent { label 'jnlp-slave'}
    options {
		timeout(time: 20, unit: 'MINUTES')
		gitLabConnection('gitlab')
	}
    environment {
        IMAGE_REPO = "172.21.51.67:5000/spring-cloud/user-service"
        IMAGE_CREDENTIAL = "credential-registry"
        DINGTALK_CREDS = credentials('dingTalk')
        PROJECT = "user-service"
    }
    stages {
        stage('checkout') {
            steps {
                container('tools') {
                    checkout scm
                }
            }
        }
        stage('mvn-package') {
            steps {
                container('tools') {
                    script{
                        sh 'mvn clean package'
                    }
                }
            }
        }
        stage('CI'){
            failFast true
            parallel {
                stage('Unit Test') {
                    steps {
                        echo "Unit Test Stage Skip..."
                    }
                }
                stage('Code Scan') {
                    steps {
                        container('tools') {
                            script {
                               devops.scan().start()
                            }
                        }
                    }
                }
            }
        }

        stage('docker-image') {
            steps {
                container('tools') {
                    script{
                        devops.docker(
                            "${IMAGE_REPO}",
                            "${GIT_COMMIT}",
                            IMAGE_CREDENTIAL
                        ).build().push()
                    }
                }
            }
        }
        stage('deploy') {
            steps {
                container('tools') {
                    script{
                    	devops.deploy("deploy",true,"deploy/deployment.yaml").start()
                    }
                }
            }
        }
    }
    post {
        success {
            script{
                devops.notificationSuccess(PROJECT,"dingTalk")
            }
        }
        failure {
            script{
                devops.notificationFailure(PROJECT,"dingTalk")
            }
        }
    }
}
pom.xml
<finalName>${project.artifactId}</finalName>
Dockerfile
FROM openjdk:8-jdk-alpine
COPY target/user-service.jar app.jar
ENV JAVA_OPTS=""
CMD [ "sh", "-c", "java $JAVA_OPTS -jar /app.jar" ]
sonar-project.properties
sonar.projectKey=user-service
sonar.projectName=user-service
# if you want disabled the DTD verification for a proxy problem for example, true by default
# JUnit like test report, default value is test.xml
sonar.sources=src/main/java
sonar.language=java
sonar.tests=src/test/java
sonar.java.binaries=target/classes
创建user-service项目,提交代码:
git init
git remote add origin http://gitlab.luffy.com/luffy-spring-cloud/user-service.git
git add .
git commit -m "Initial commit"
git push -u origin master

# 提交到develop分支
git checkout -b develop
git push -u origin develop
创建Jenkins任务,测试自动部署
访问http://user-service-dev.luffy.com/ 验证
服务消费者
RestTemplate
在Spring中,提供了RestTemplate。RestTemplate是Spring提供的用于访问Rest服务的客户端。而在SpringCloud中也是使用此服务进行服务调用的。
创建bill-service模块
新的模块初始化三部曲:
- pom.xml
- 启动类
- 配置文件
pom.xml 添加如下内容:
        <dependency>
            <groupId>org.springframework.cloud</groupId>
            <artifactId>spring-cloud-starter-netflix-eureka-client</artifactId>
        </dependency>
全量内容如下:
<?xml version="1.0" encoding="UTF-8"?>
<project xmlns="http://maven.apache.org/POM/4.0.0" xmlns:xsi="http://www.w3.org/2001/XMLSchema-instance"
         xsi:schemaLocation="http://maven.apache.org/POM/4.0.0 https://maven.apache.org/xsd/maven-4.0.0.xsd">
    <modelVersion>4.0.0</modelVersion>
    <parent>
        <groupId>org.springframework.boot</groupId>
        <artifactId>spring-boot-starter-parent</artifactId>
        <version>2.3.6.RELEASE</version>
        <relativePath/> <!-- lookup parent from repository -->
    </parent>
    <groupId>com.luffy</groupId>
    <artifactId>bill-service</artifactId>
    <version>0.0.1-SNAPSHOT</version>
    <name>bill-service</name>
    <description>bill-service</description>

    <properties>
        <java.version>1.8</java.version>
        <spring-cloud.version>Hoxton.SR9</spring-cloud.version>
    </properties>

    <dependencies>
        <dependency>
            <groupId>org.springframework.cloud</groupId>
            <artifactId>spring-cloud-starter</artifactId>
        </dependency>
        <dependency>
            <groupId>org.springframework.cloud</groupId>
            <artifactId>spring-cloud-starter-netflix-eureka-client</artifactId>
        </dependency>
        <dependency>
            <groupId>org.springframework.boot</groupId>
            <artifactId>spring-boot-starter-web</artifactId>
        </dependency>
        <dependency>
            <groupId>org.springframework.boot</groupId>
            <artifactId>spring-boot-starter-actuator</artifactId>
        </dependency>
        <dependency>
            <groupId>org.springframework.boot</groupId>
            <artifactId>spring-boot-starter-test</artifactId>
            <scope>test</scope>
            <exclusions>
                <exclusion>
                    <groupId>org.junit.vintage</groupId>
                    <artifactId>junit-vintage-engine</artifactId>
                </exclusion>
            </exclusions>
        </dependency>
    </dependencies>

    <dependencyManagement>
        <dependencies>
            <dependency>
                <groupId>org.springframework.cloud</groupId>
                <artifactId>spring-cloud-dependencies</artifactId>
                <version>${spring-cloud.version}</version>
                <type>pom</type>
                <scope>import</scope>
            </dependency>
        </dependencies>
    </dependencyManagement>

    <build>
        <finalName>${project.artifactId}</finalName><!--打jar包去掉版本号-->
        <plugins>
            <plugin>
                <groupId>org.springframework.boot</groupId>
                <artifactId>spring-boot-maven-plugin</artifactId>
            </plugin>
        </plugins>
    </build>

</project>
BillServiceApplication
package com.luffy.billservice;

import org.springframework.boot.SpringApplication;
import org.springframework.boot.autoconfigure.SpringBootApplication;
import org.springframework.cloud.client.discovery.EnableDiscoveryClient;

@SpringBootApplication
@EnableDiscoveryClient
public class BillServiceApplication {
    public static void main(String[] args) {
        SpringApplication.run(BillService.class, args);
    }
}
application.yml
server:
  port: 7001
eureka:
  client:
    serviceUrl:
      defaultZone: ${EUREKA_SERVER:http://admin:admin@localhost:8761/eureka/}
  instance:
    instance-id: ${eureka.instance.hostname}:${server.port}
    prefer-ip-address: true
    hostname: ${INSTANCE_HOSTNAME:bill-service}
spring:
  application:
    name: bill-service
BillController
package com.luffy.billservice.controller;

import org.springframework.beans.factory.annotation.Autowired;
import org.springframework.context.annotation.Bean;
import org.springframework.web.bind.annotation.GetMapping;
import org.springframework.web.bind.annotation.RestController;
import org.springframework.web.client.RestTemplate;

@RestController
public class BillController {

    @Bean
    public RestTemplate restTemplate() {
        return new RestTemplate();
    }

    @Autowired
    private RestTemplate restTemplate;

    @GetMapping("/bill/user")
    public String getUserInfo(){
        return restTemplate.getForObject("http://localhost:7000/user", String.class);
    }
}
问题:
- 服务调用采用指定IP+Port方式,注册中心未使用
- 多个服务负载均衡
使用注册中心实现服务调用
修改BillController
package com.luffy.billservice.controller;

import org.springframework.beans.factory.annotation.Autowired;
import org.springframework.cloud.client.loadbalancer.LoadBalanced;
import org.springframework.context.annotation.Bean;
import org.springframework.web.bind.annotation.GetMapping;
import org.springframework.web.bind.annotation.RestController;
import org.springframework.web.client.RestTemplate;

@RestController
public class BillController {

    @Bean
    @LoadBalanced
    public RestTemplate restTemplate() {
        return new RestTemplate();
    }

    @Autowired
    private RestTemplate restTemplate;

    @GetMapping("/bill/user")
    public String getUserInfo(){
        return restTemplate.getForObject("http://user-service/user", String.class);
    }
}
访问测试
总体来说,就是通过为加入@LoadBalanced注解的RestTemplate添加一个请求拦截器,在请求前通过拦截器获取真正的请求地址,最后进行服务调用。
友情提醒:若被@LoadBalanced注解的RestTemplate访问正常的服务地址,如http://127.0.0.1:8080/hello时,是会提示无法找到此服务的。
具体原因:serverid必须是我们访问的服务名称 ,当我们直接输入ip的时候获取的server是null,就会抛出异常。
如果想继续调用,可以通过如下方式:
package com.luffy.billservice.controller;

import org.springframework.beans.factory.annotation.Autowired;
import org.springframework.beans.factory.annotation.Qualifier;
import org.springframework.cloud.client.loadbalancer.LoadBalanced;
import org.springframework.context.annotation.Bean;
import org.springframework.web.bind.annotation.GetMapping;
import org.springframework.web.bind.annotation.RestController;
import org.springframework.web.client.RestTemplate;

@RestController
public class BillController {

    @Bean
    @LoadBalanced
    public RestTemplate restTemplate() {
        return new RestTemplate();
    }

    @Autowired
    private RestTemplate restTemplate;

    @Bean("normalRestTemplate")
    public RestTemplate normalRestTemplate() {
        return new RestTemplate();
    }

    @Autowired
    @Qualifier("normalRestTemplate")
    RestTemplate normalRestTemplate;


    @GetMapping("/service/user")
    public String getUserInfo(){
        return restTemplate.getForObject("http://user-service/user", String.class);
    }

    @GetMapping("/normal")
    public String normal() {
        return normalRestTemplate.getForObject("http://localhost:7000/user", String.class);
    }
}
Ribbon 负载均衡
再启动一个user-service-instance2,复制user-service项目
修改user-service-instance2的application.yml的server.port
server:
  port: 7002
eureka:
  client:
    serviceUrl:
      defaultZone: ${EUREKA_SERVER:http://admin:admin@peer1:8761/eureka/}
  instance:
    instance-id: ${eureka.instance.hostname}:${server.port}
    prefer-ip-address: true
    hostname: ${INSTANCE_HOSTNAME:user-service}
spring:
  application:
    name: user-service
修改user-service-instance2的UserController.java,为了可以区分是哪个服务提供者的实例提供的服务
package com.luffy.userservice.controller;


import com.luffy.userservice.entity.User;
import org.springframework.web.bind.annotation.GetMapping;
import org.springframework.web.bind.annotation.PathVariable;
import org.springframework.web.bind.annotation.RestController;

import java.util.Random;

@RestController
public class UserController {

    @GetMapping("/user")
    public String getUserService(){
        return "this is user-service-instance2";
    }

    @GetMapping("/user-nums")
    public Integer getUserNums(){
        return new Random().nextInt(100);
    }

    //{"id": 123, "name": "张三", "age": 20, "sex": "male"}
    @GetMapping("/user/{id}")
    public User getUserInfo(@PathVariable("id") int id){
        User user = new User();
        user.setId(id);
        user.setAge(20);
        user.setName("zhangsan");
        user.setSex("male");
        return user;
    }
}
访问bill-service,查看调用结果(默认是轮询策略)
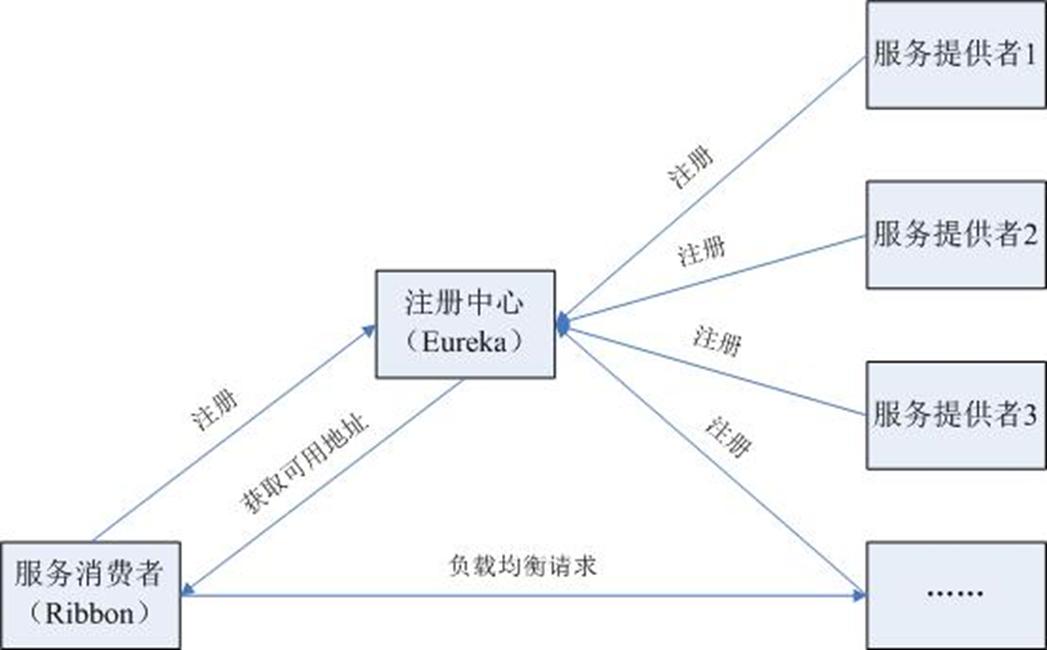
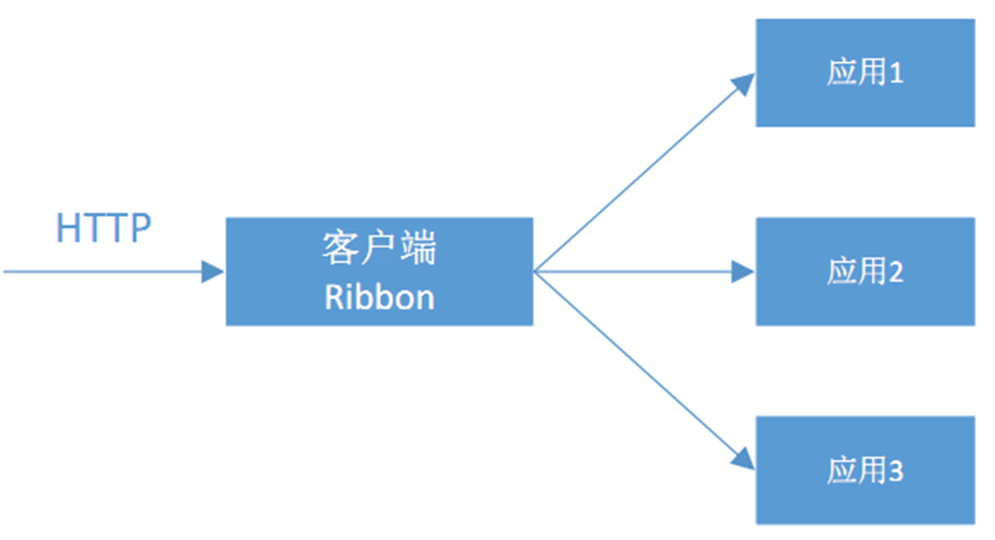
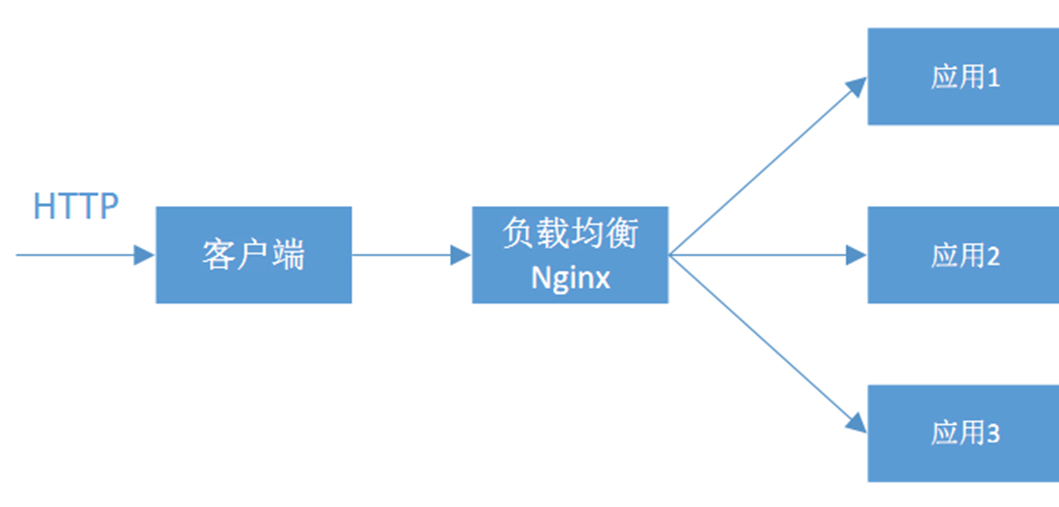
Spring Cloud Ribbon是一个基于Http和TCP的客服端负载均衡工具,它是基于Netflix Ribbon实现的。与Eureka配合使用时,Ribbon可自动从Eureka Server (注册中心)获取服务提供者地址列表,并基于负载均衡算法,通过在客户端中配置ribbonServerList来设置服务端列表去轮询访问以达到均衡负载的作用。
eureka-client中包含了ribbon的包,所以不需要单独引入
如何修改调用策略?
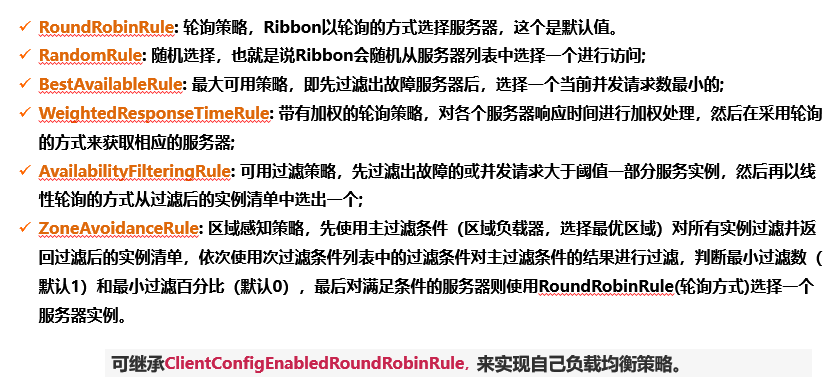
- 代码中指定rule的规则
- 配置文件配置
在bill-service中新建package,com.luffy.rule,注意不能被springboot扫描到,不然规则就成了全局规则,所有的ribbonclient都会应用到该规则。
package com.luffy.rule;

import com.netflix.loadbalancer.*;
import org.springframework.context.annotation.Bean;
import org.springframework.context.annotation.Configuration;

@Configuration
public class RandomConfiguration {

    @Bean
    public IRule ribbonRule() {
        // new BestAvailableRule();
        // new WeightedResponseTimeRule();
        return new RandomRule();
    }
}
修改BillController
import com.luffy.rule.RandomConfiguration;
import org.springframework.boot.SpringApplication;
import org.springframework.boot.autoconfigure.SpringBootApplication;
import org.springframework.cloud.client.discovery.EnableDiscoveryClient;
import org.springframework.cloud.netflix.ribbon.RibbonClient;

@SpringBootApplication
@EnableDiscoveryClient
@RibbonClient(name = "user-service", configuration = RandomConfiguration.class)
public class BillServiceApplication {
    public static void main(String[] args) {
        SpringApplication.run(BillServiceApplication.class, args);
    }
}
注释掉代码:
package com.luffy.ticket;

import com.luffy.rule.RandomConfiguration;
import org.springframework.boot.SpringApplication;
import org.springframework.boot.autoconfigure.SpringBootApplication;
import org.springframework.cloud.client.discovery.EnableDiscoveryClient;
import org.springframework.cloud.netflix.ribbon.RibbonClient;

@SpringBootApplication
@EnableDiscoveryClient
//@RibbonClient(name = "USER-SERVICE", configuration = RandomConfiguration.class)
public class TicketApplication {
    public static void main(String[] args) {
        SpringApplication.run(TicketApplication.class, args);
    }
}
修改配置文件:
server:
  port: ${SERVER_PORT:9000}

spring:
  application:
    name: bill-service

eureka:
  client:
    service-url:
      defaultZone: ${EUREKA_SERVER:http://admin:admin@peer1:8762/eureka/,http://admin:admin@peer2:8763/eureka/}
  instance:
    prefer-ip-address: true
    instance-id: ${spring.cloud.client.ip-address}:${server.port}
user-service:
  ribbon:
    NFLoadBalancerRuleClassName: com.netflix.loadbalancer.RandomRule
声明式服务Feign
从上一章节,我们知道,当我们要调用一个服务时,需要知道服务名和api地址,这样才能进行服务调用,服务少时,这样写觉得没有什么问题,但当服务一多,接口参数很多时,上面的写法就显得不够优雅了。所以,接下来,来说说一种更好更优雅的调用服务的方式:Feign。
Feign是Netflix开发的声明式、模块化的HTTP客户端。Feign可帮助我们更好更快的便捷、优雅地调用HTTP API。
在Spring Cloud中,使用Feign非常简单——创建一个接口,并在接口上添加一些注解。Feign支持多种注释,例如Feign自带的注解或者JAX-RS注解等 Spring Cloud对Feign进行了增强,使Feign支持了Spring MVC注解,并整合了Ribbon和 Eureka,从而让Feign 的使用更加方便。只需要通过创建接口并用注解来配置它既可完成对Web服务接口的绑定。
https://github.com/OpenFeign/feign
对bill-service项目添加openfeign的依赖引入:
        <dependency>
            <groupId>org.springframework.cloud</groupId>
            <artifactId>spring-cloud-starter-openfeign</artifactId>
        </dependency>
启动类中引入Feign注解:
package com.luffy.billservice;

import org.springframework.boot.SpringApplication;
import org.springframework.boot.autoconfigure.SpringBootApplication;
import org.springframework.cloud.client.discovery.EnableDiscoveryClient;
import org.springframework.cloud.openfeign.EnableFeignClients;

@SpringBootApplication
@EnableDiscoveryClient
@EnableFeignClients
public class BillServiceApplication {

    public static void main(String[] args) {
        SpringApplication.run(BillServiceApplication.class, args);
    }

}
建立interface
package com.luffy.billservice.interfaces;

import com.luffy.billservice.entity.User;
import org.springframework.cloud.openfeign.FeignClient;
import org.springframework.web.bind.annotation.GetMapping;
import org.springframework.web.bind.annotation.PathVariable;

@FeignClient(name="user-service")
public interface UserServiceCli {

    @GetMapping("/user")
    public String getUserService();

    @GetMapping("/user/{id}")
    public User getUserInfo(@PathVariable("id") int id);
}
拷贝User类到当前项目:
package com.luffy.billservice.entity;

public class User {
    private int id;
    private String name;
    private int age;
    private String sex;

    public int getAge() {
        return age;
    }

    public int getId() {
        return id;
    }

    public String getName() {
        return name;
    }

    public String getSex() {
        return sex;
    }

    public void setAge(int age) {
        this.age = age;
    }

    public void setId(int id) {
        this.id = id;
    }

    public void setName(String name) {
        this.name = name;
    }

    public void setSex(String sex) {
        this.sex = sex;
    }
}
修改BillController
package com.luffy.billservice.controller;

import com.luffy.billservice.entity.User;
import com.luffy.billservice.interfaces.UserServiceCli;
import org.springframework.beans.factory.annotation.Autowired;
import org.springframework.web.bind.annotation.GetMapping;
import org.springframework.web.bind.annotation.PathVariable;
import org.springframework.web.bind.annotation.RestController;

@RestController
public class BillController {

    @Autowired
    private UserServiceCli userServiceCli;


    @GetMapping("/bill/user")
    public String getUserInfo(){
        return userServiceCli.getUserService();
    }

    @GetMapping("/bill/user/{id}")
    public User getUserInfo(@PathVariable("id") int id){
        return userServiceCli.getUserInfo(id);
        //return restTemplate.getForObject("http://USER-SERVICE/user/" + id, String.class);
    }
}
CICD持续交付服务消费者
拷贝user-service的交付文件,替换如下:
- user-service -> bill-service
- 7000 -> 7001
- INGRESS_USER_SERVICE -> INGRESS_BILL_SERVICE
$ kubectl -n dev edit configmap devops-config
...
data:
  INGRESS_MYBLOG: blog-dev.luffy.com
  INGRESS_SPRINGBOOTDEMO: springboot-dev.luffy.com
  INGRESS_USER_SERVICE: user-service-dev.luffy.com
  INGRESS_BILL_SERVICE: user-service-dev.luffy.com
  NAMESPACE: dev
...
创建develop分支,提交代码到gitlab仓库,验证持续交付
前面主要讲解了下服务消费者如何利用原生、ribbon、fegin三种方式进行服务调用的,其实每种调用方式都是使用restTemplate来进行调用的,只是有些进行了增强,目的是使用起来更简单高效。
Hystrix 断路器
为什么需要断路器?
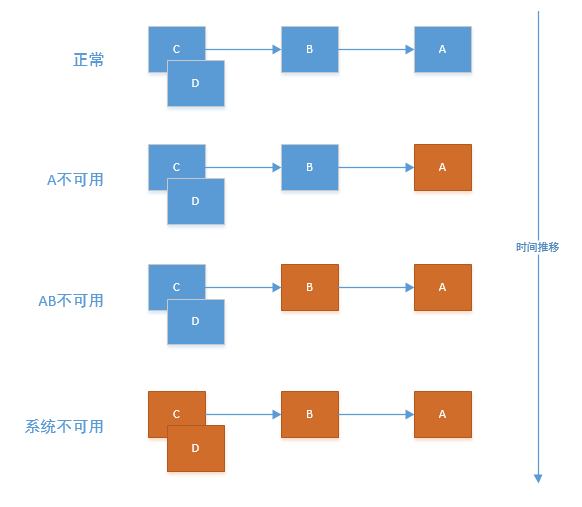
A作为服务提供者,B为A的服务消费者,C和D是B的服务消费者。A不可用引起了B的不可用,并将不可用像滚雪球一样放大到C和D时,雪崩效应就形成了。
因此,需要实现一种机制,可以做到自动监控服务状态并根据调用情况进行自动处理。
-
记录时间周期内服务调用失败次数
-
维护断路器的打开、关闭、半开三种状态
-
提供fallback机制
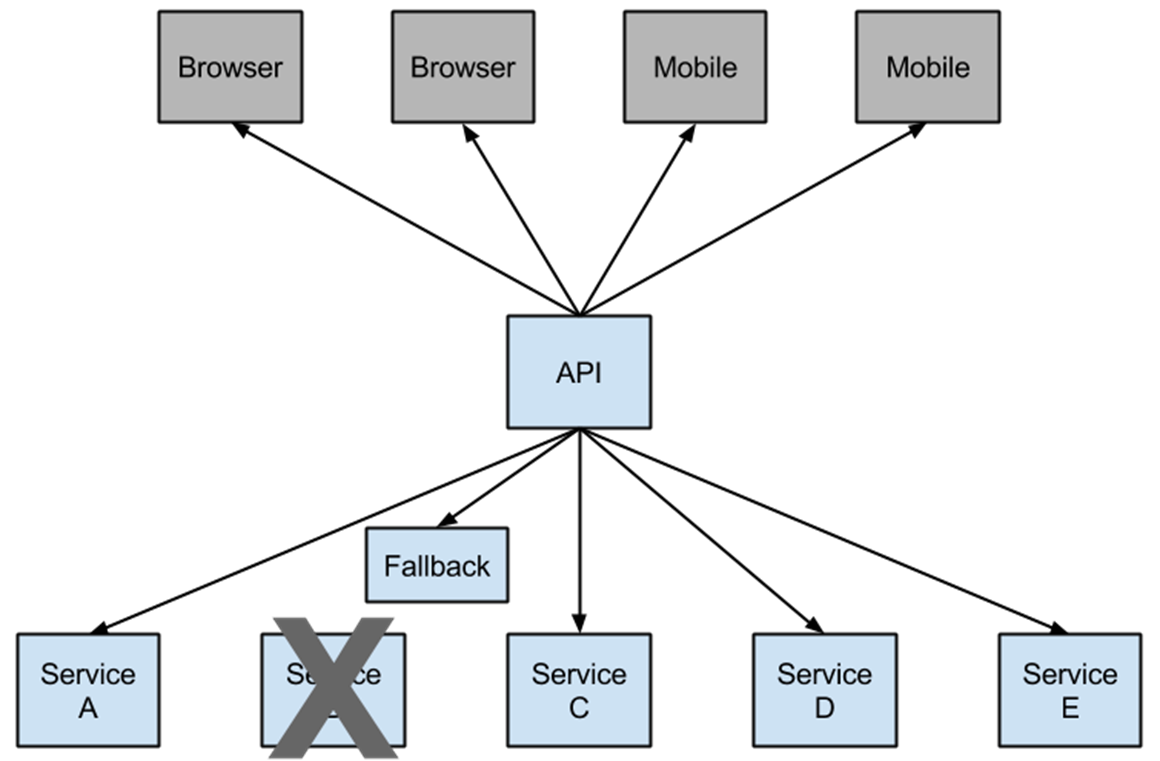
修改bill-service项目:
pom.xml
        <dependency>
            <groupId>org.springframework.cloud</groupId>
            <artifactId>spring-cloud-starter-netflix-hystrix</artifactId>
        </dependency>
application.xml
feign:
  hystrix:
    enabled: true
启动类添加注解@EnableCircuitBreaker
package com.luffy.billservice;

import org.springframework.boot.SpringApplication;
import org.springframework.boot.autoconfigure.SpringBootApplication;
import org.springframework.cloud.client.circuitbreaker.EnableCircuitBreaker;
import org.springframework.cloud.client.discovery.EnableDiscoveryClient;
import org.springframework.cloud.openfeign.EnableFeignClients;

@SpringBootApplication
@EnableDiscoveryClient
@EnableFeignClients
@EnableCircuitBreaker
public class BillServiceApplication {

    public static void main(String[] args) {
        SpringApplication.run(BillServiceApplication.class, args);
    }

}
UserServiceCli.java
package com.luffy.bill.interfaces;

import com.luffy.bill.entity.User;
import org.springframework.cloud.openfeign.FeignClient;
import org.springframework.web.bind.annotation.GetMapping;
import org.springframework.web.bind.annotation.PathVariable;

@FeignClient(name="user-service", fallback = UserServiceFallbackImpl.class)
public interface UserServiceCli {

    @GetMapping("/user")
    public String getUserService();

    @GetMapping("/user/{id}")
    public User getUserInfo(@PathVariable("id") int id);
}
UserServiceFallbackImpl.java
package com.luffy.billservice.interfaces;

import com.luffy.billservice.entity.User;
import org.springframework.stereotype.Component;

@Component("fallback")
public class UserServiceFallbackImpl implements UserServiceCli{

    @Override
    public String getUserService() {
        return "fallback user service";
    }

    @Override
    public User getUserInfo(int id) {
        User user = new User();
        user.setId(1);
        user.setName("feign-fallback");
        return user;
    }
}
停止user-service测试熔断及fallback。
Hystrix Dashboard
前面一章,我们讲解了如何整合Hystrix。而在实际情况下,使用了Hystrix的同时,还会对其进行实时的数据监控,反馈各类指标数据。今天我们就将讲解下Hystrix Dashboard和Turbine.其中Hystrix Dashboard是一款针对Hystrix进行实时监控的工具,通过Hystrix Dashboard我们可以在直观地看到各Hystrix Command的请求响应时间, 请求成功率等数据,监控单个实例内的指标情况。后者Turbine,能够将多个实例指标数据进行聚合的工具。
在eureka注册中心处访问bill-service的服务actuator地址: http://192.168.136.1:7001/actuator/info
若访问不了,需要添加如下内容:
-
为服务消费者bill-service的pom.xml添加依赖:
<dependency> <groupId>org.springframework.boot</groupId> <artifactId>spring-boot-starter-actuator</artifactId> </dependency> -
修改application.yml配置:
management:
  endpoints:
    web:
      exposure:
        include: "*"
访问http://localhost:9000/actuator/hystrix.stream 即可访问到断路器的执行状态,但是显示不太友好,因此需要dashboard。
新建项目,hystrix-dashboard
Hystrix-dashboard(仪表盘)是一款针对Hystrix进行实时监控的工具,通过Hystrix Dashboard我们可以在直观地看到各Hystrix Command的请求响应时间, 请求成功率等数据。
pom.xml引入依赖包:
<?xml version="1.0" encoding="UTF-8"?>
<project xmlns="http://maven.apache.org/POM/4.0.0" xmlns:xsi="http://www.w3.org/2001/XMLSchema-instance"
         xsi:schemaLocation="http://maven.apache.org/POM/4.0.0 https://maven.apache.org/xsd/maven-4.0.0.xsd">
    <modelVersion>4.0.0</modelVersion>
    <parent>
        <groupId>org.springframework.boot</groupId>
        <artifactId>spring-boot-starter-parent</artifactId>
        <version>2.3.6.RELEASE</version>
        <relativePath/> <!-- lookup parent from repository -->
    </parent>
    <groupId>com.luffy</groupId>
    <artifactId>hystrix-dashboard</artifactId>
    <version>0.0.1-SNAPSHOT</version>
    <name>hystrix-dashboard</name>
    <description>hystrxi dashboard</description>

    <properties>
        <java.version>1.8</java.version>
        <spring.cloud-version>Hoxton.SR9</spring.cloud-version>
    </properties>

    <dependencies>
        <dependency>
            <groupId>org.springframework.cloud</groupId>
            <artifactId>spring-cloud-starter-netflix-hystrix-dashboard</artifactId>
        </dependency>

        <dependency>
            <groupId>org.springframework.boot</groupId>
            <artifactId>spring-boot-starter</artifactId>
        </dependency>

        <dependency>
            <groupId>org.springframework.boot</groupId>
            <artifactId>spring-boot-starter-test</artifactId>
            <scope>test</scope>
            <exclusions>
                <exclusion>
                    <groupId>org.junit.vintage</groupId>
                    <artifactId>junit-vintage-engine</artifactId>
                </exclusion>
            </exclusions>
        </dependency>
    </dependencies>

    <dependencyManagement>
        <dependencies>
            <dependency>
                <groupId>org.springframework.cloud</groupId>
                <artifactId>spring-cloud-dependencies</artifactId>
                <version>${spring.cloud-version}</version>
                <type>pom</type>
                <scope>import</scope>
            </dependency>
        </dependencies>
    </dependencyManagement>

    <build>
        <plugins>
            <plugin>
                <groupId>org.springframework.boot</groupId>
                <artifactId>spring-boot-maven-plugin</artifactId>
            </plugin>
        </plugins>
    </build>

</project>
启动类加上@EnableHystrixDashboard注解:
package com.luffy.hystrixdashboard;

import org.springframework.boot.SpringApplication;
import org.springframework.boot.autoconfigure.SpringBootApplication;
import org.springframework.cloud.netflix.hystrix.dashboard.EnableHystrixDashboard;

@SpringBootApplication
@EnableHystrixDashboard
public class HystrixDashboardApplication {

    public static void main(String[] args) {
        SpringApplication.run(HystrixDashboardApplication.class, args);
    }

}
application.yml
#应用名称
server:
  port: 9696

spring:
  application:
    name: hystrix-dashboard
hystrix:
  dashboard:
    proxy-stream-allow-list: "*"
访问localhost:9696/hystrix
-
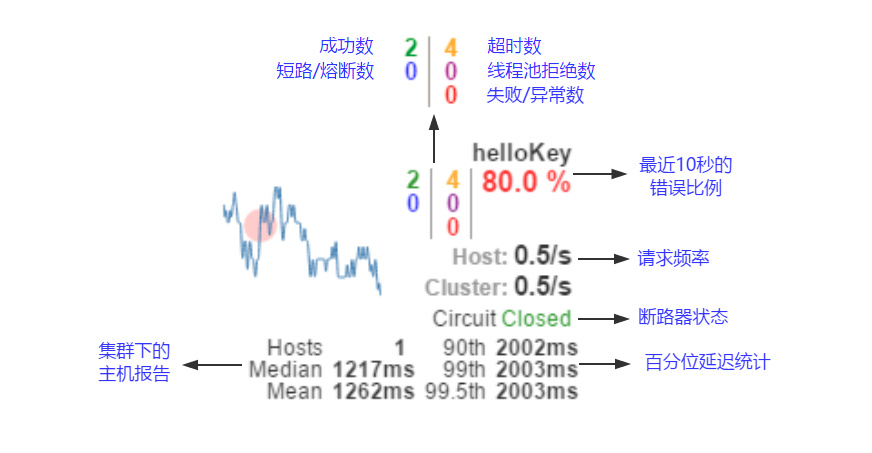
实心圆:它有颜色和大小之分,分别代表实例的监控程度和流量大小。如上图所示,它的健康度从绿色、黄色、橙色、红色递减。通过该实心圆的展示,我们就可以在大量的实例中快速的发现故障实例和高压力实例。
-
曲线:用来记录 2 分钟内流量的相对变化,我们可以通过它来观察到流量的上升和下降趋势。
-
其他一些数量指标如下图所示
提交代码到gitlab仓库
Turbine
hystrix只能实现单个微服务的监控,可是一般项目中是微服务是以集群的形式搭建,一个一个的监控不现实。而Turbine的原理是,建立一个turbine服务,并注册到eureka中,并发现eureka上的hystrix服务。通过配置turbine会自动收集所需hystrix的监控信息,最后通过dashboard展现,以达到集群监控的效果。
简单来说,就是通过注册到注册中心,发现其他服务的hystrix服务,然后进行聚合数据,最后通过自身的端点输出到仪表盘上进行个性化展示。这我们就监控一个turbine应用即可,当有新增的应用加入时,我们只需要配置下turbine参数即可。
微服务网关
为什么需要网关
在微服务框架中,每个对外服务都是独立部署的,对外的api或者服务地址都不是不尽相同的。对于内部而言,很简单,通过注册中心自动感知即可。但我们大部分情况下,服务都是提供给外部系统进行调用的,不可能同享一个注册中心。同时一般上内部的微服务都是在内网的,和外界是不连通的。而且,就算我们每个微服务对外开放,对于调用者而言,调用不同的服务的地址或者参数也是不尽相同的,这样就会造成消费者客户端的复杂性,同时想想,可能微服务可能是不同的技术栈实现的,有的是http、rpc或者websocket等等,也会进一步加大客户端的调用难度。所以,一般上都有会有个api网关,根据请求的url不同,路由到不同的服务上去,同时入口统一了,还能进行统一的身份鉴权、日志记录、分流等操作。
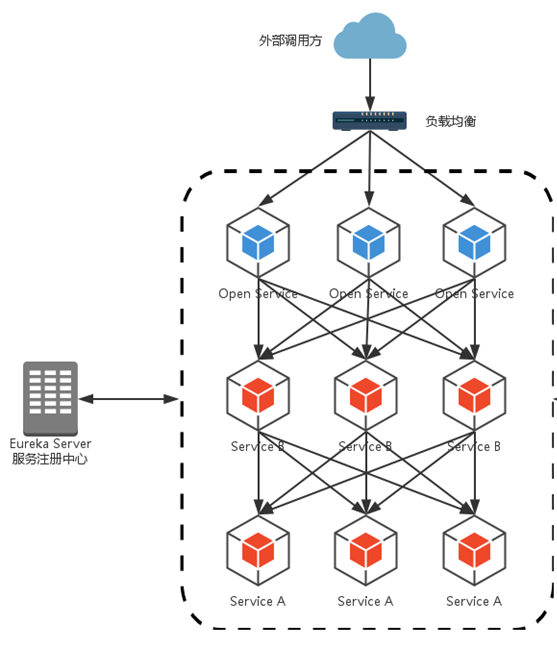
网关的功能
-
减少api请求次数
-
限流
-
缓存
-
统一认证
-
降低微服务的复杂度
-
支持混合通信协议(前端只和api通信,其他的由网关调用)
-
…
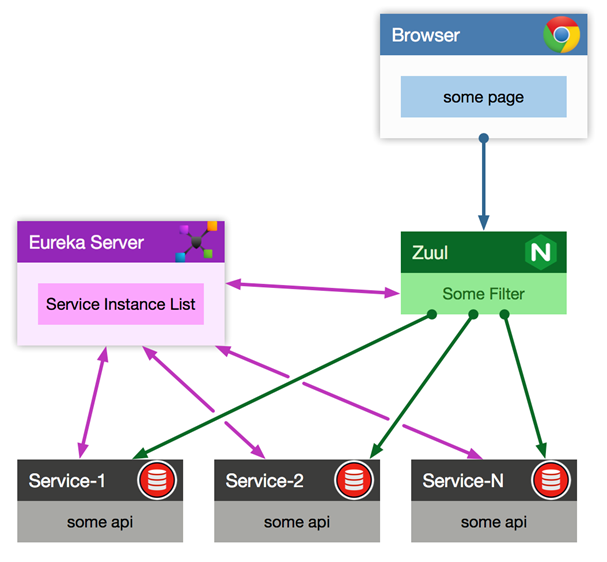
Zuul实践
新建模块,gateway-zuul,(spring cloud)
pom.xml中需要引入zuul和eureka服务发现的依赖
        <dependency>
            <groupId>org.springframework.cloud</groupId>
            <artifactId>spring-cloud-starter-netflix-zuul</artifactId>
        </dependency>
        <dependency>
            <groupId>org.springframework.cloud</groupId>
            <artifactId>spring-cloud-starter-netflix-eureka-client</artifactId>
        </dependency>
启动类添加注解
package com.luffy.gateway;

import org.springframework.boot.SpringApplication;
import org.springframework.boot.autoconfigure.SpringBootApplication;
import org.springframework.cloud.client.discovery.EnableDiscoveryClient;
import org.springframework.cloud.netflix.zuul.EnableZuulProxy;

@SpringBootApplication
@EnableZuulProxy
@EnableDiscoveryClient
public class ZuulGatewayApplication {
    public static void main(String[] args) {
        SpringApplication.run(ZuulGatewayApplication.class, args);
    }
}
配置文件:
server:
  port: 10000

spring:
  application:
    name: gateway-zuul

eureka:
  client:
    serviceUrl:
      defaultZone: ${EUREKA_SERVER:http://admin:admin@localhost:8761/eureka/}
  instance:
    instance-id: ${eureka.instance.hostname}:${server.port}
    prefer-ip-address: true
    hostname: ${INSTANCE_HOSTNAME:gateway-zuul}
启动后,访问:
http://localhost:10000/bill-service/bill/user/1
http://localhost:10000/user-service/user
通过如下方式,配置短路径:
zuul:
  routes:
    user-service: /users/**
    bill-service:
      path: /bill/**
      service-id: bill-service
http://localhost:10000/users/user/1
                                                 --->  http://localhost:7000/user/2
http://localhost:10000/user-service/user/1


http://localhost:10000/bill/service/user/2
                                                 --->http://localhost:7001/service/user/2
http://localhost:10000/bill-service/service/user/2
zuul如何指定对外暴漏api的path,如:
所有的api都是这样:http://zuul-host:zuul-port/apis/,可以添加zuul.prefix:/apis
配置一下配置文件
management:
  endpoints:
    web:
      exposure:
        include: "*"
可以访问到zuul的route列表, http://localhost:10000/actuator/routes/ ,添加details可以访问到详细信息
{
"/apis/users/**": "user-service",
"/apis/bill/**": "bill-service",
"/apis/bill-service/**": "bill-service",
"/apis/user-service/**": "user-service"
}
提交代码到代码仓库
集中配置中心
Spring Cloud Config 配置中心提供了一个中心化的外部配置,默认使用git存储配置信息,这样就可以对配置信息进行版本管理。
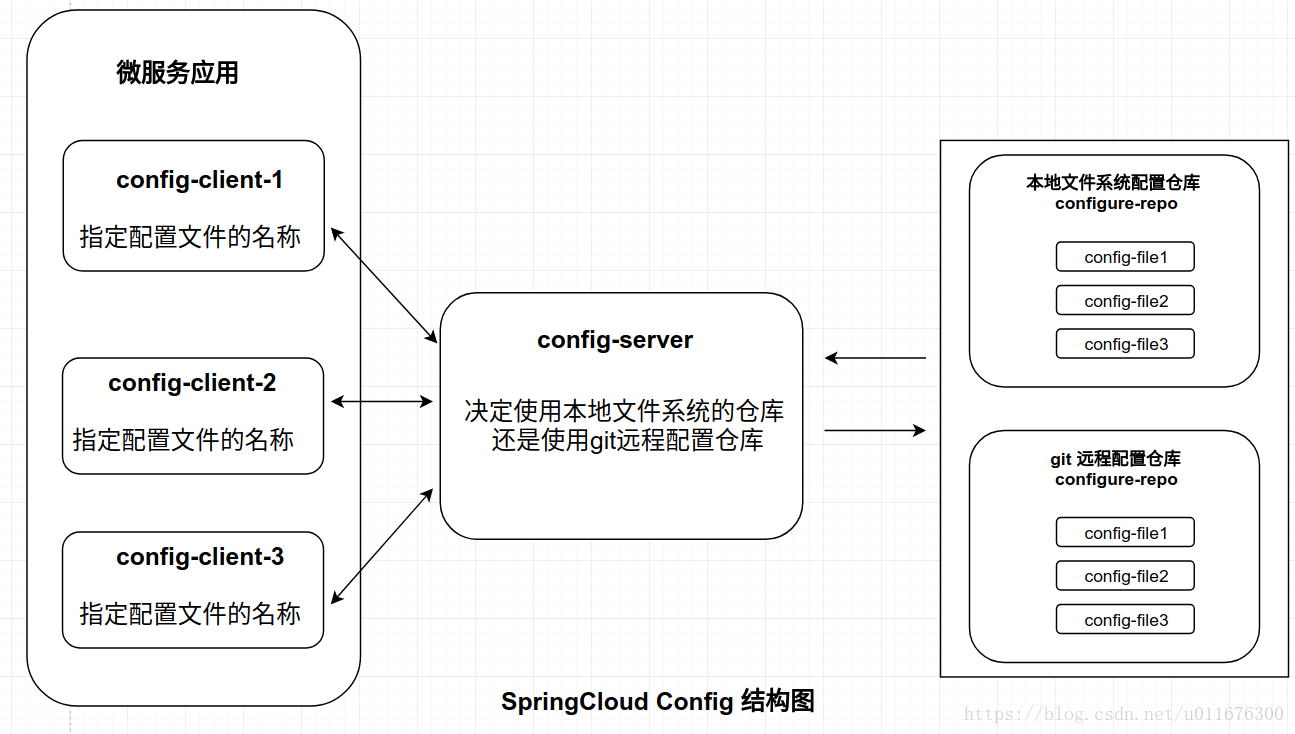
实践
- 创建代码仓库
configure-repo,用于集中存储配置文件 - 创建项目
config-server,用于接受各项目的连接,提供配置文件读取服务 - 修改
user-service服务,验证通过config-server读取集中配置库中的配置文件
代码仓库:
-
新建gitlab项目,
http://gitlab.luffy.com/luffy-spring-cloud/configure-repo.git -
准备配置文件
configs/common-dev.ymldatasource: url: jdbc:mysql://mysql-dev:3306/ driverClassName: com.mysql.jdbc.Driver username: xxx password: xxxxxx luffy: cityconfigs/user-service-dev.ymllogging: level: org.springframework.cloud: debug env: devconfigs/common-test.ymlenv: test -
提交代码到master分支
新建项目,config-server
修改pom.xml(springboot和springcloud的版本)
-
springboot版本<version>2.3.6.RELEASE</version> -
spring-cloud版本<properties> <java.version>1.8</java.version> <spring-cloud.version>Hoxton.SR9</spring-cloud.version> </properties> -
添加
config-server的依赖<dependency> <groupId>org.springframework.cloud</groupId> <artifactId>spring-cloud-config-server</artifactId> </dependency>
修改application.yml
server:
port: 8088
spring:
application:
name: config-server
profiles:
active: git
cloud:
config:
server:
git:
uri: http://gitlab.luffy.com/luffy-spring-cloud/configure-repo.git
username: ${GIT_USER:root}
password: ${GIT_PSW:1qaz2wsx}
default-label: master
search-paths: configs
#native:
# searchLocations: classpath:/configs/{profile}
修改启动类,添加注解
package com.luffy.configserver;
import org.springframework.boot.SpringApplication;
import org.springframework.boot.autoconfigure.SpringBootApplication;
import org.springframework.cloud.config.server.EnableConfigServer;
@SpringBootApplication
@EnableConfigServer
public class ConfigServerApplication {
public static void main(String[] args) {
SpringApplication.run(ConfigServerApplication.class, args);
}
}
启动config-server,访问:
http://localhost:8088/common/dev
http://localhost:8088/user-service/dev
修改user-service服务,从config-server读取配置
-
添加使用统一配置中心的依赖:
<dependency> <groupId>org.springframework.cloud</groupId> <artifactId>spring-cloud-starter-config</artifactId> </dependency> -
新建
bootstrap.yml,不能放在application.yml中,因为bootstrap的加载早于应用程序bean启动的加载,因此,删掉application.yml,直接使用bootstrap.ymlserver: port: 7000 eureka: client: serviceUrl: defaultZone: ${EUREKA_SERVER:http://admin:admin@localhost:8761/eureka/} instance: instance-id: ${eureka.instance.hostname}:${server.port} prefer-ip-address: true hostname: ${INSTANCE_HOSTNAME:user-service} spring: application: name: user-service cloud: config: uri: http://localhost:8088 profile: dev #当前读取dev环境的配置 name: user-service, common # 从user-service-dev.yml,common-dev.yml中读取 -
新建
ValueController.javapackage com.luffy.userservice.controller; import org.springframework.beans.factory.annotation.Value; import org.springframework.cloud.context.config.annotation.RefreshScope; import org.springframework.web.bind.annotation.GetMapping; import org.springframework.web.bind.annotation.RestController; @RestController public class ValueController { @Value("${env}") private String env; @Value("${datasource.url}") private String datasource; @Value("${spring.application.name}") private String applicationName; @GetMapping("/value/env") public String getValueEnv(){ return "current env is " + env; } @GetMapping("/value/application") public String getValueApplication(){ return "current env is " + applicationName; } @GetMapping("/value/datasource") public Object getDatasource(){ return datasource; } } -
访问如下页面进行验证
$ localhost:7000/value/env $ localhost:7000/value/application $ localhost:7000/value/datasource
高可用
config-server多个实例,如何配置客户端?
config-server作为服务提供者,注册到eureka服务注册中心user-service配置从注册中心获取config-server的服务
config-server注册到服务注册中心
-
pom.xml添加eureka依赖包
<dependency> <groupId>org.springframework.cloud</groupId> <artifactId>spring-cloud-starter-netflix-eureka-client</artifactId> </dependency> -
application.yml中连接服务注册中心
eureka: client: serviceUrl: defaultZone: ${EUREKA_SERVER:http://admin:admin@localhost:8761/eureka/} instance: instance-id: ${eureka.instance.hostname}:${server.port} prefer-ip-address: true hostname: ${INSTANCE_HOSTNAME:config-server} -
启动类添加注解
@EnableDiscoveryClient
修改user-service,从注册中心发现服务
-
修改bootstrap.yml
server: port: 7000 spring: cloud: config: profile: dev discovery: enabled: true service-id: config-server name: user-service, common eureka: client: serviceUrl: defaultZone: ${EUREKA_SERVER:http://admin:admin@peer1:8761/eureka/} instance: instance-id: ${eureka.instance.hostname}:${server.port} prefer-ip-address: true hostname: ${INSTANCE_HOSTNAME:user-service}
客户端配置刷新
配置中心的配置变动后,客户端如何获取最新的配置。
-
修改
ValueController.java,添加注解@RestController @RefreshScope public class ValueController -
添加actuator包
<dependency> <groupId>org.springframework.boot</groupId> <artifactId>spring-boot-starter-actuator</artifactId> </dependency> -
开放显示所有管理接口
management: endpoints: web: exposure: include: "*" -
重启
user-service -
修改
configure-repo中的配置并提交,访问http://localhost:7000/value/env -
执行刷新
$ curl -XPOST http://localhost:7000/actuator/refresh -
再次访问
http://localhost:7000/value/env
调用链路追踪
介绍
服务追踪的追踪单元是从客户发起请求(request)抵达被追踪系统的边界开始,到被追踪系统向客户返回响应(response)为止的过程,称为一个 trace。每个 trace 中会调用若干个服务,为了记录调用了哪些服务,以及每次调用的消耗时间等信息,在每次调用服务时,埋入一个调用记录,称为一个 span。这样,若干个有序的 span 就组成了一个 trace。在系统向外界提供服务的过程中,会不断地有请求和响应发生,也就会不断生成 trace,把这些带有 span 的 trace 记录下来,就可以描绘出一幅系统的服务拓扑图。附带上 span 中的响应时间,以及请求成功与否等信息,就可以在发生问题的时候,找到异常的服务;根据历史数据,还可以从系统整体层面分析出哪里性能差,定位性能优化的目标。
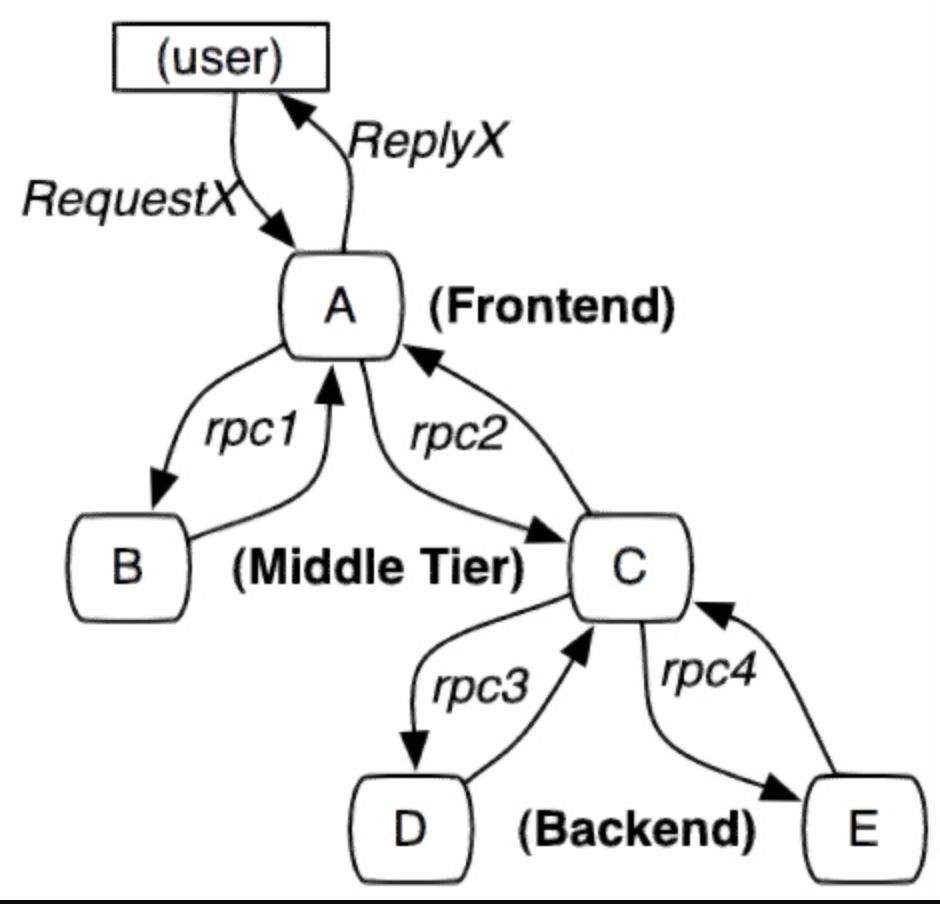
Spring Cloud Sleuth 为服务之间调用提供链路追踪。通过 Sleuth 可以很清楚的了解到一个服务请求经过了哪些服务,每个服务处理花费了多长。从而让我们可以很方便的理清各微服务间的调用关系。此外 Sleuth 可以帮助我们:
- 耗时分析: 通过 Sleuth 可以很方便的了解到每个采样请求的耗时,从而分析出哪些服务调用比较耗时;
- 链路优化: 对于调用比较频繁的服务,可以针对这些服务实施一些优化措施。
- 可视化错误: 对于程序未捕捉的异常,可以通过集成 Zipkin 服务界面上看到; Spring Cloud Sleuth 可以结合 Zipkin,将信息发送到 Zipkin,利用 Zipkin 的存储来存储信息,利用 Zipkin UI 来展示数据。
https://zipkin.io/pages/quickstart
启动zipkin
apiVersion: apps/v1
kind: Deployment
metadata:
name: zipkin
namespace: dev
spec:
replicas: 1
selector:
matchLabels:
app: zipkin
template:
metadata:
labels:
app: zipkin
spec:
containers:
- name: zipkin
image: openzipkin/zipkin:2.22
imagePullPolicy: IfNotPresent
ports:
- containerPort: 9411
resources:
requests:
memory: 400Mi
cpu: 50m
limits:
memory: 2Gi
cpu: 2000m
---
apiVersion: v1
kind: Service
metadata:
name: zipkin
namespace: dev
spec:
ports:
- port: 9411
protocol: TCP
targetPort: 9411
selector:
app: zipkin
sessionAffinity: None
type: ClusterIP
status:
loadBalancer: {}
---
apiVersion: extensions/v1beta1
kind: Ingress
metadata:
name: zipkin
namespace: dev
spec:
rules:
- host: zipkin.luffy.com
http:
paths:
- backend:
serviceName: zipkin
servicePort: 9411
path: /
status:
loadBalancer: {}
实践
分别对bill-service和user-service进行改造:
pom.xml中添加:
<dependency>
<groupId>org.springframework.cloud</groupId>
<artifactId>spring-cloud-starter-zipkin</artifactId>
</dependency>
application.yml
spring:
zipkin:
base-url: http://zipkin.luffy.com # zipkin服务器的地址
sender:
type: web # 设置使用http的方式传输数据
sleuth:
sampler:
probability: 1 # 设置抽样采集为100%,默认为0.1,即10%
logging:
level:
org.springframework.cloud: debug
访问zuul网关的接口http://localhost:10000/apis/bill-service/bill/user/2
2020-11-14 19:28:49.274 DEBUG [bill-service,949aa3570daa1031,43ea952f1e5e36eb,true] 36852 — [-user-service-6] c.s.i.w.c.f.TraceLoadBalancerFeignClient : Before send
bill-service,949aa3570daa1031,43ea952f1e5e36eb,true
说明:
- bill-service: 服务名称
- 949aa3570daa1031: 是TranceId,一条链路中,只有一个TranceId
- 43ea952f1e5e36eb:则是spanId,链路中的基本工作单元id
- true:表示是否将数据输出到其他服务,true则会把信息输出到其他可视化的服务上观察
SpringBoot Admin监控
新建项目,springboot-admin
pom.xml
<?xml version="1.0" encoding="UTF-8"?>
<project xmlns="http://maven.apache.org/POM/4.0.0" xmlns:xsi="http://www.w3.org/2001/XMLSchema-instance"
xsi:schemaLocation="http://maven.apache.org/POM/4.0.0 https://maven.apache.org/xsd/maven-4.0.0.xsd">
<modelVersion>4.0.0</modelVersion>
<parent>
<groupId>org.springframework.boot</groupId>
<artifactId>spring-boot-starter-parent</artifactId>
<version>2.3.6.RELEASE</version>
<relativePath/> <!-- lookup parent from repository -->
</parent>
<groupId>com.luffy</groupId>
<artifactId>springboot-admin</artifactId>
<version>0.0.1-SNAPSHOT</version>
<name>springboot-admin</name>
<description>Demo project for Spring Boot</description>
    <properties>
        <java.version>1.8</java.version>
        <spring-cloud.version>Hoxton.SR9</spring-cloud.version>
    </properties>
<dependencies>
<dependency>
<groupId>de.codecentric</groupId>
<artifactId>spring-boot-admin-starter-server</artifactId>
<version>2.2.1</version>
</dependency>
        <dependency>
            <groupId>org.springframework.cloud</groupId>
            <artifactId>spring-cloud-starter-netflix-eureka-client</artifactId>
        </dependency>
<dependency>
<groupId>org.springframework.cloud</groupId>
<artifactId>spring-cloud-starter</artifactId>
</dependency>
<dependency>
<groupId>org.springframework.boot</groupId>
<artifactId>spring-boot-starter-test</artifactId>
<scope>test</scope>
<exclusions>
<exclusion>
<groupId>org.junit.vintage</groupId>
<artifactId>junit-vintage-engine</artifactId>
</exclusion>
</exclusions>
</dependency>
</dependencies>
<dependencyManagement>
<dependencies>
<dependency>
<groupId>org.springframework.cloud</groupId>
<artifactId>spring-cloud-dependencies</artifactId>
<version>${spring-cloud.version}</version>
<type>pom</type>
<scope>import</scope>
</dependency>
</dependencies>
</dependencyManagement>
<build>
<plugins>
<plugin>
<groupId>org.springframework.boot</groupId>
<artifactId>spring-boot-maven-plugin</artifactId>
</plugin>
</plugins>
</build>
</project>
配置文件
server:
  port: 8769

spring:
  application:
    name: springboot-admin

eureka:
  client:
    serviceUrl:
      defaultZone: ${EUREKA_SERVER:http://admin:admin@localhost:8761/eureka/}
  instance:
    instance-id: ${eureka.instance.hostname}:${server.port}
    prefer-ip-address: true
    hostname: ${INSTANCE_HOSTNAME:springboot-admin}
启动类
package com.luffy.springbootadmin;

import de.codecentric.boot.admin.server.config.EnableAdminServer;
import org.springframework.boot.SpringApplication;
import org.springframework.boot.autoconfigure.SpringBootApplication;
import org.springframework.cloud.client.discovery.EnableDiscoveryClient;

@SpringBootApplication
@EnableDiscoveryClient
@EnableAdminServer
public class SpringbootAdminApplication {

    public static void main(String[] args) {
        SpringApplication.run(SpringbootAdminApplication.class, args);
    }

}
客户端,所有注册到eureka的服务,添加依赖即可
        <dependency>
            <groupId>de.codecentric</groupId>
            <artifactId>spring-boot-admin-starter-client</artifactId>
            <version>2.2.1</version>
        </dependency>
小结
-
伴随着业务场景复杂度的提高,单体架构应用弊端显现,微服务的思想逐步盛行,微服务架构带来诸多便捷的同时,也带来了很多问题,最主要的是多个微服务的服务治理(服务发现、调用、负载均衡、跟踪)
-
为了解决服务治理问题,出现了微服务框架(Dubbo、Spring Cloud等)
-
Spring Cloud是一个大的生态,基于Java语言封装了一系列的工具,方便业务直接使用来解决上述服务治理相关的问题
-
Spring Cloud Netflix 体系下提供了eureka、ribbon、feign、hystrix、zuul等工具结合spring cloud sleuth合zipkin实现服务跟踪
-
SpringBoot是微服务的开发框架,通过maven与Spring Cloud生态中的组件集成,极大方便了java应用程序的交付

https://blog.csdn.net/smallsunl/article/details/78778790
问题:
- 无论是Dubbo还是SpringCloud,均属于Java语言体系下的产物,跨语言没法共用,同时,通过走了一遍内部集成的过程,可以清楚的发现,服务治理过程中,各模块的集成,均需要对原始业务逻辑形成侵入。
- 在kubernetes的生态下,已经与生俱来带了很多好用的功能(自动服务发现与负载均衡)
- 服务治理的根本其实是网络节点通信的治理,因此,以istio为代表的第二代服务治理平台开始逐步兴起